Quickstart Guide
Table of Contents
ThoughtSpot provides Visual Embed SDK, a Javascript library to help you embed ThoughtSpot components such as charts and tables, Liveboards, Search functionality, or the full ThoughtSpot experience in your app.
Let’s get started with embedding a ThoughtSpot component in your application.
Before you embed🔗
Check if you have access to a ThoughtSpot instance. If you don’t have a ThoughtSpot application instance, sign up for a Free Trial.
|
Important
|
You must add your embedding application domain(s) to the CSP and CORS allowlist on the Develop > Customizations > Security Settings page in ThoughtSpot. To configure CORS and CSP settings, you need admin or developer privilege (Has Developer privilege). |
Create content in ThoughtSpot🔗
Building content in ThoughtSpot for embedding is done through ThoughtSpot’s UI, following the same process for an internal business use case.
The basic sequence involves the following steps:
-
Log in to your ThoughtSpot instance.
-
Connect your instance to a Data Warehouse.
If you’re using the Free Trial instance, note that it is already connected to a sample data warehouse. -
Create the objects required for embedding. For example, charts, tables, and Liveboard.
To learn more about data connections, data models and objects, and how to search data and create Liveboards, see ThoughtSpot product documentation.
Get started with embedding🔗
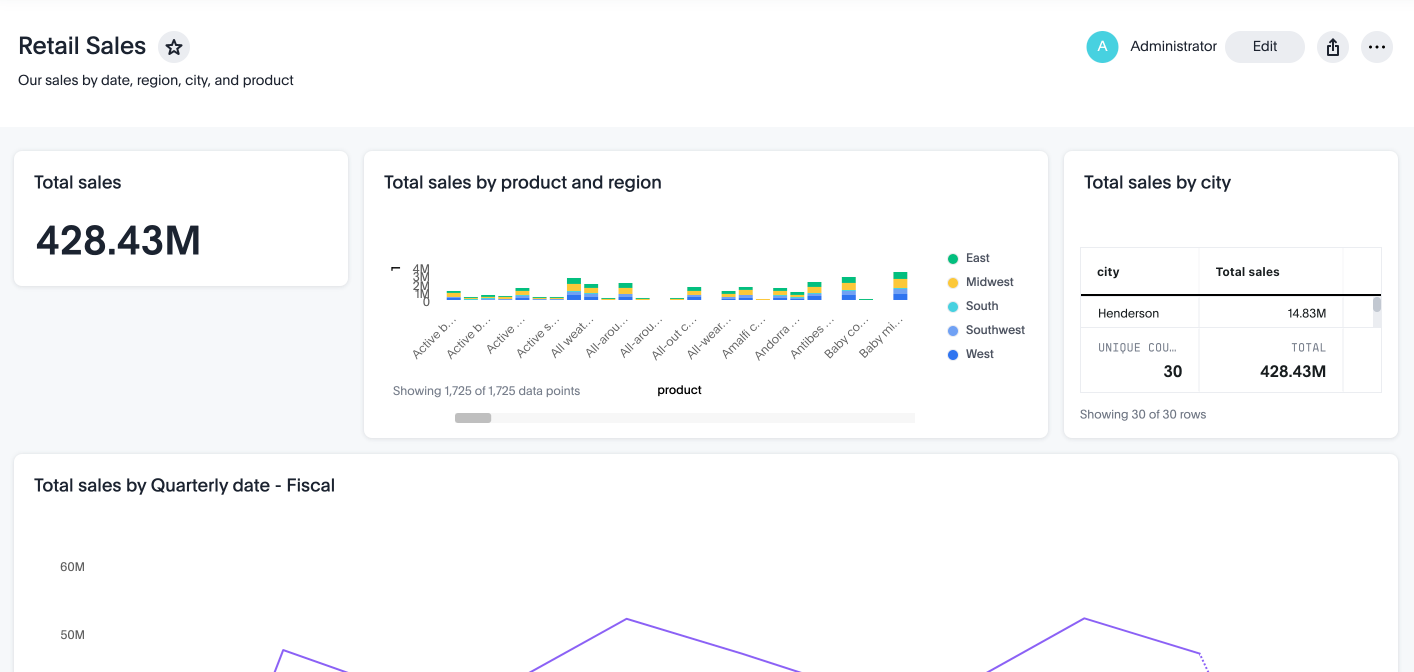
This section provides a set of steps to quickly embed a Liveboard from the Free Trial or your own ThoughtSpot application instance. The following figure shows a sample Liveboard with charts and a table:
If you want to embed other ThoughtSpot components and explore the additional capabilities of the Visual Embed SDK, see the embedding components guide or the resources listed in the Explore more section.
Step 1: Import the Visual Embed SDK🔗
The latest version of the Visual Embed SDK is available at https://www.npmjs.com/package/@thoughtspot/visual-embed-sdk.
The Visual Embed SDK is available as both ES Module (ESM) and Universal Module Definition (UMD) modules, allowing you to use it in a variety of environments.
In this example, we’ll import the LiveboardEmbed SDK package to embed a Liveboard.
npm
import {
    LiveboardEmbed,
    AuthType,
    init,
    prefetch,
    EmbedEvent
}
from '@thoughtspot/visual-embed-sdk';
ES6
<script type = 'module'>
    import {
        LiveboardEmbed,
        AuthType,
        init,
        prefetch
    }
from 'https://cdn.jsdelivr.net/npm/@thoughtspot/visual-embed-sdk/dist/tsembed.es.js';
Step 2: Initialize the SDK🔗
To initialize the SDK, the following information is required:
-
thoughtSpotHost
The hostname of your ThoughtSpot application instance. For example,team2.thoughtspot.cloud. See FAQs to know how to find the hostname of your application instance. -
authType
Authentication type. ThoughtSpot supports a variety of Authentication types. For testing purposes, you can useAuthType.None. For other authentication options, see Authentication.
init({
    thoughtSpotHost: '<%=tshost%>',
    authType: AuthType.None,
});
Ensure that you call init before render().
Step 3: Add the component🔗
Each embedding option requires you to define the properties of the component you want to embed. For example, to embed a Liveboard, you must specify the GUID of the Liveboard.
import {
    LiveboardEmbed, // Import the class to embed a ThoughtSpot Liveboard
    AuthType,       // Import authentication type constants
    init,           // Import the SDK initialization function
} from '@thoughtspot/visual-embed-sdk';

// Initialize the ThoughtSpot Visual Embed SDK with the host and authentication type.

init({
    thoughtSpotHost: '<%=tshost%>', // Replace <%=tshost%> with your ThoughtSpot instance URL.
    authType: AuthType.None, // no authentication (for testing purposes only).
});

// Create a new LiveboardEmbed instance.
// '#container' is the selector for the DOM element where the Liveboard will be rendered.

const lb = new LiveboardEmbed('#container', {
// frameParams sets the iframe width and height to fill the container.
    frameParams: {
        width: '100%',
        height: '100%',
    },
    liveboardId: '22e79c21-eec4-40bf-997b-7454c6e3a2a5', // GUID of the Liveboard to embed.
});

// Render the embedded Liveboard inside the specified container.
// This step is required to display the Liveboard.
lb.render();
The #container in the above example is a selector for the DOM node which the code assumes is already attached to DOM. The SDK will render the ThoughtSpot component inside this container element.
|
Note
|
|
- React
// Import the LiveboardEmbed React component from the ThoughtSpot Visual Embed SDK
import { LiveboardEmbed } from '@thoughtspot/visual-embed-sdk/react';

const App = () => {
    // Create a ref to interact with the embedded Liveboard instance
    const embedRef = useEmbedRef();

    // Event handler called when the Liveboard has finished rendering
    const onLiveboardRendered = () => {
        // Trigger a HostEvent to update runtime filters on the embedded Liveboard
        // This filter sets the 'item type' column to only show rows where the value is 'Jackets'
        embedRef.current.trigger(HostEvent.UpdateRuntimeFilters, [
            {
                columnName: 'item type',
                operator: RuntimeFilterOp.EQ,
                values: ['Jackets'],
            },
        ]);
    };

    // Render the LiveboardEmbed component with the specified Liveboard ID and event handler
    return (
        <LiveboardEmbed
            ref={embedRef} // Attach the ref for programmatic control
            liveboardId="22e79c21-eec4-40bf-997b-7454c6e3a2a5" // The GUID of the Liveboard to embed
            onLiveboardRendered={onLiveboardRendered} // Register the event handler
        />
    );
};
For more information about events, see HostEvent and EmbedEvent.
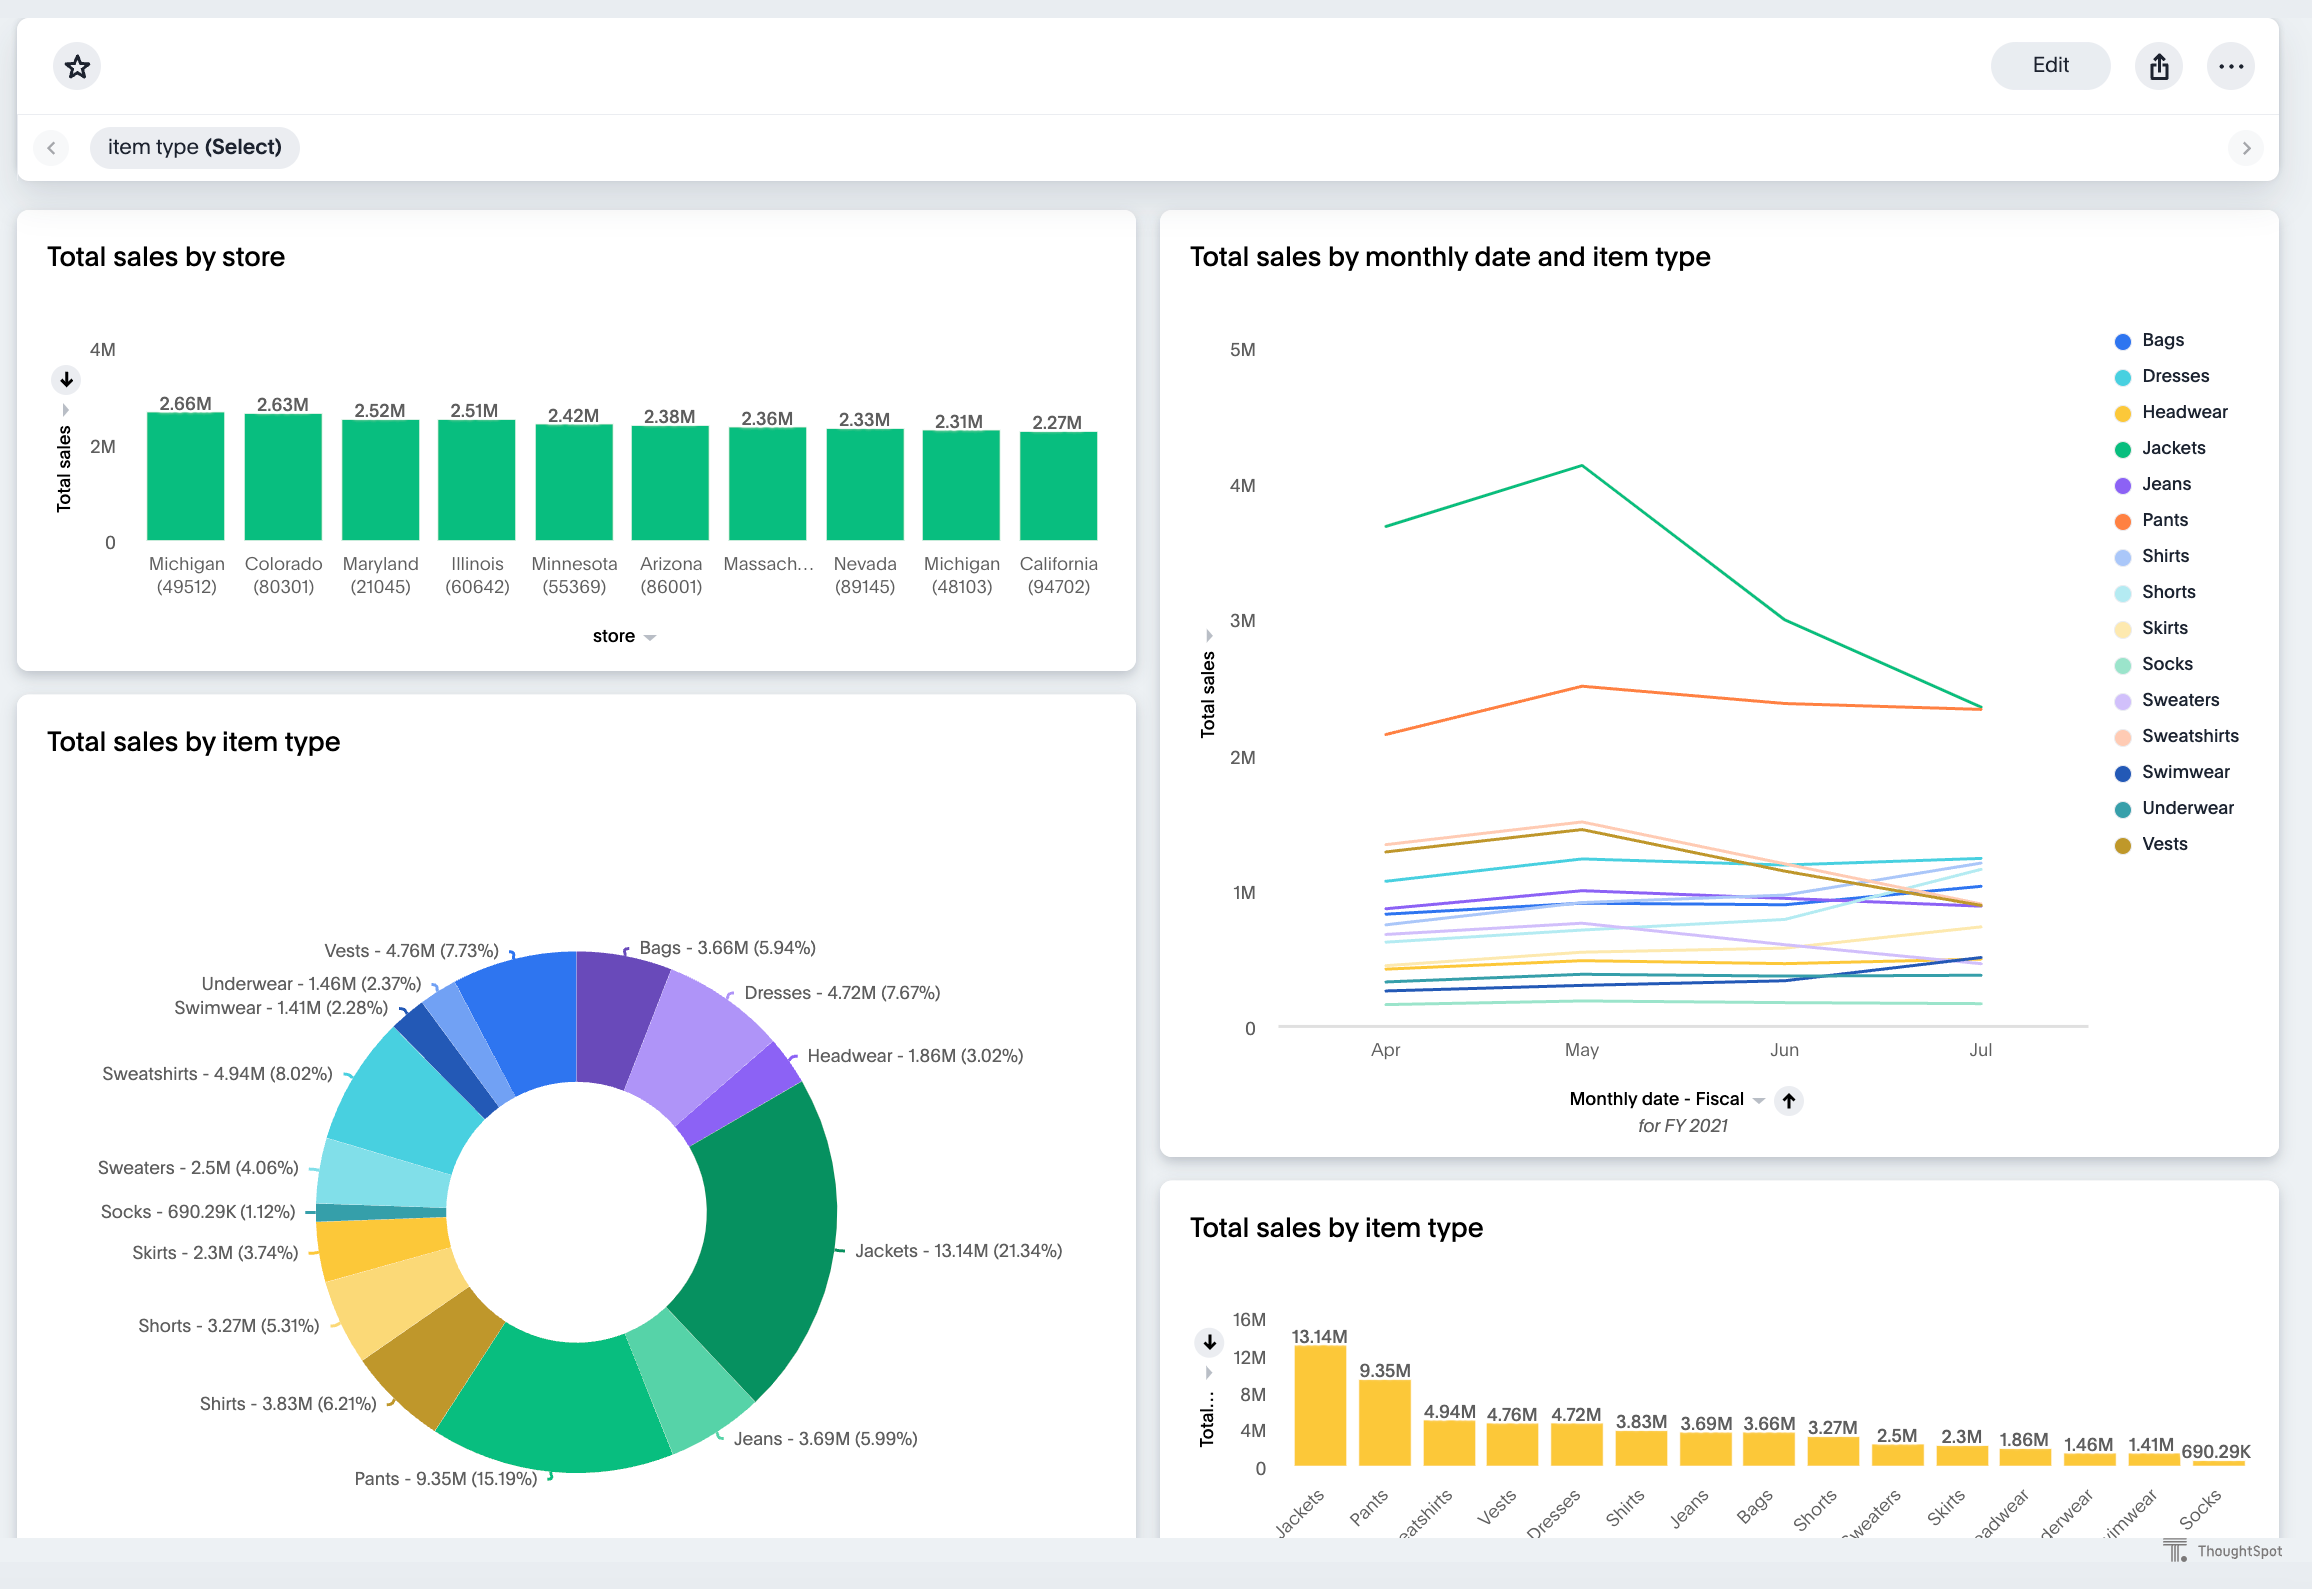
Step 4: Verify the embedded object🔗
Load the application page with the embedded object in your app.
The following figure shows an embedded view of the Liveboard object.
Explore more🔗
In addition to this quickstart guide, a comprehensive hands-on embedding fundamentals tutorial is available.
To explore the additional capabilities that would provide you more control over your embedded application, see the following pages:
-
Leverage ThoughtSpot’s AI-powered search and analytics capabilities with Spotter.
-
Explore the other embedding options available with the SDK:
-
Create a custom action and assign it to an embedded Liveboard or Answer page generated from a search query.
-
Control the visibility of menu actions on the embedded page.
-
Register events that your app can listen to and respond with appropriate actions.
Create custom workflows using Host Events. -
Customize your ThoughtSpot embedded experience using custom CSS.
-
For performance optimization, consider these best practices recommended by ThoughtSpot.
-
Explore the SDK and test your embed in the Code sandbox.
-
Use the resources available in the Visual Embed SDK and Developer examples GitHub repositories.
Help and support🔗
-
Refer to FAQs and Troubleshooting guide.
-
Use the in-app Live Chat support for instant help.
This feature is available only on non-embedded ThoughtSpot instances. -
Contact ThoughtSpot Support and Community.
-
Join Discord to connect with developer assistance.