String. Defines if the data panel on the Search page should be shown in the expanded or collapsed mode. Allowed values are:
-
expandshows the Data panel -
collapseCollapses Data panel
The Visual Embed SDK is the most convenient way to embed different types of ThoughtSpot content. However, if your portal or system does not have a way to use the Visual Embed SDK JavaScript library, you can embed ThoughtSpot components using an iFrame element. For example, to embed a Liveboard or visualization into applications such as SharePoint, Google Sites, or WordPress, you may want to use an iFrame element.
All embedded ThoughtSpot objects require authentication. If the host application does not allow custom Javascript, you can use one of the following authentication methods:
Basic authentication with username and password
SSO authentication
When doing a direct embed, SAML is typically the only SSO mechanism that can be implemented. If you cannot use the Visual Embed SDK, this typically means the environment you are embedding ThoughtSpot within has restrictions on using JavaScript, which limits the ability to use the Trusted Authentication method for SSO. Any sign-in method to ThoughtSpot creates a session, stored in the browser cookies, so if your platform has a way to complete the trusted authentication flow at some point, even on a different page from where the direct iFrame embed of a Liveboard is located, it may be a viable SSO authentication mechanism.
To enable SAML SSO authentication for an iFrame embedded instance:
On your ThoughtSpot instance, configure SAML SSO.
Configure your IdP to allow the host domain to embed the IdP’s authentication page.
Each IdP has a specific way to enable this setting. For example, for Okta, you can use the Enable iframe embedding option in Okta’s Admin console.
If you have access to the Security settings page in the Develop tab, you can add your host domain to CSP and CORS allowlists. For example, if you are embedding a ThoughtSpot object in a Google site, you can add sites.google.com to the allowlists.
If you don’t have access to Develop > Security settings page, contact ThoughtSpot support to update CSP settings on your instance.
Apart from the steps described in the following sections, you can generate an iFrame src URL using the HostEvent.GetIframeUrl in the Visual Embed Playground. This event is available in Visual Embed SDK v1.34.0 and can be used on ThoughtSpot instances with 10.4.0.cl or a later release version.
For more information, see GetIframeUrl.
To embed Liveboard in an iFrame, you need the Liveboard GUID.
To get the Liveboard URL:
Log in to ThoughtSpot.
Navigate to the Liveboard that you want to embed.
Click the share icon.
Click Copy link.
Note the GUID of the Liveboard.
Note the URL format to embed a Liveboard in an iFrame:
https://{ThoughtSpot-Host}/?embedApp=true#/embed/viz/{Liveboard_id}
You can also add additional flags and runtime filters and parameter overrides as query parameters in the embed URL.
To embed Liveboard in an iFrame, you need the Liveboard and visualization GUIDs.
To get the visualization URL:
Navigate to the Liveboard that contains the visualization you want to embed.
On the visualization tile, click the More ![]() and select Copy link.
and select Copy link.
Note the GUIDs of the Liveboard and visualization.
The URL format to embed a visualization in an iFrame is:
https://{ThoughtSpot-Host}/?embedApp=true#/embed/viz/{Liveboard_id}/{visualization_id}
You can also add additional flags, runtime filters, and Parameter overrides as query parameters in the embed URL.
To ThoughtSpot Search in an iFrame, the data object GUID is required. The data source can be Model, Table, or View.
To find the GUID of the datasource object:
Log in to your ThoughtSpot application instance:
Navigate to Data.
https://<your-thoughtspot-instance>/#/data/tables/
On the Data > Home page, click on data object type. For example, if the data source object is a Model, click Models and open the Model.
In the address bar of the web browser, note the GUID of the data object. For example, in the following address string, the GUID is 9d93a6b8-ca3a-4146-a1a1-e908b71b963f:
https://<your-thoughtspot-instance>/#/data/tables/9d93a6b8-ca3a-4146-a1a1-e908b71b963f
Copy the GUID.
Note the URL format to embed ThoughtSpot Search in an iFrame:
https://{ThoughtSpot-Host}/?embedApp=true&dataSources="cd252e5c-b552-49a8-821d-3eadaa049cca"#/answer
If you want to pre-define the search criteria, you can specify the search token string and executeSearch flag in the URL as shown in this example:
https://{ThoughtSpot-Host}/?embedApp=true&dataSources="cd252e5c-b552-49a8-821d-3eadaa049cca"&searchTokenString=[sales][region]&executeSearch=true&isSearchEmbed=true#/answer
You can also add additional flags, runtime filters, and Parameter overrides as query parameters in the embed URL.
To embed the Natural Language Search page in the iFrame, use the following URL format:
https://{ThoughtSpot-Host}/?embedApp=true#/embed/insights/create-ai-answer
To load the object with a pre-selected data source object, use the following URL format:
https://{ThoughtSpot-Host}/?embedApp=true&worksheet={Worksheet_id}#/embed/insights/create-ai-answer
To load the object with a pre-defined query to fetch data from a specific Model, use the following URL format:
https://{ThoughtSpot-Host}/?embedApp=true&query={query-string}&worksheet={worksheet_id}&executeSearch=true#/embed/insights/create-ai-answer
To embed a ThoughtSpot application page, specify the page ID.
Home page
https://{ThoughtSpot-Host}/?embedApp=true#/home
Liveboards page
https://{ThoughtSpot-Host}/?embedApp=true#/pinboards
Data page
https://{ThoughtSpot-Host}/?embedApp=true#/data/tables
SpotIQ page
https://{ThoughtSpot-Host}/?embedApp=true#/insights/results
Answers page
https://{ThoughtSpot-Host}/?embedApp=true#/answers
To embed the full ThoughtSpot application with top navigation bar, set the primaryNavHidden to false:
https://{ThoughtSpot-Host}/?embedApp=true&primaryNavHidden=false&profileAndHelpInNavBarHidden=true#/home
To apply runtime filters, add the column name, operator, and value as query parameters in the URL.
For example, to filter michigan in the State columns, pass these values as filter parameters in the URL:
Liveboard embed
https://{ThoughtSpot-host}/?embedApp=true&p&col1=State&op1=EQ&val1=michigan#/embed/viz/{Liveboard_id}
If the per Org URL feature is enabled on your ThoughtSpot instance, the URL format will be:
https://{ThoughtSpot-host}/?embedApp=true&p&col1=State&op1=EQ&val1=michigan&OrgID=1#/embed/viz/{Liveboard_id}
Visualization embed
http://{ThoughtspotHost}/?embedApp=true&col1=State&op1=EQ&val1=michigan#/embed/viz/{Liveboard_id}/{visualization_id}
If the per Org URL feature is enabled on your ThoughtSpot instance, the URL format will be:
http://{ThoughtspotHost}/?embedApp=true&col1=State&op1=EQ&val1=michigan&OrgID=1#/embed/viz/{Liveboard_id}/{visualization_id}
Search embed
https://{ThoughtSpot-Host}/?embedApp=true&dataSources="cd252e5c-b552-49a8-821d-3eadaa049cca"&col1=State&op1=EQ&val1=michigan#/embed/answer
To apply Parameter overrides, add the Parameter name and value as query parameters in the URL:
Liveboard embed
https://{ThoughtSpot-host}/?embedApp=true¶m1=Discount¶mVal1=0.25#/embed/viz/{Liveboard_id}
If the per Org URL feature is enabled on your ThoughtSpot instance, the URL format will be:
https://{ThoughtSpot-host}/?embedApp=true¶m1=Discount¶mVal1=0.25&OrgID=1#/embed/viz/{Liveboard_id}
Visualization URL embed
https://{ThoughtSpot-host}/?embedApp=true¶m1=Discount¶mVal1=0.25#/
embed/viz/{Liveboard_id}/{visualization_id}
If the per Org URL feature is enabled on your ThoughtSpot instance, the URL format will be:
https://{ThoughtSpot-host}/?embedApp=true¶m1=Discount¶mVal1=0.25&OrgID=1#/
embed/viz/{Liveboard_id}/{visualization_id}
Search embed
https://{ThoughtSpot-Host}/?embedApp=true¶m1=Discount¶mVal1=0.25&dataSources=
["cd252e5c-b552-49a8-821d-3eadaa049cca"]&col1=State&op1=EQ&val1=michigan#/embed/answer
|
Note
|
The Natural Language Search component does not support runtime overrides. |
If the per Org URL feature is enabled on your ThoughtSpot instance, a sample URL format will be:
Liveboard embed
https://{ThoughtSpot-Host}/?embedApp=true&orgId=1#/embed/viz/{Liveboard_id}
Visualization embed
https://{ThoughtSpot-Host}/?embedApp=true&orgId=1#/embed/viz/{Liveboard_id}/{visualization_id}
Search Embed
https://{ThoughtSpot-Host}/?embedApp=true&dataSources="cd252e5c-b552-49a8-821d-3eadaa049cca"&orgId=1#/answer
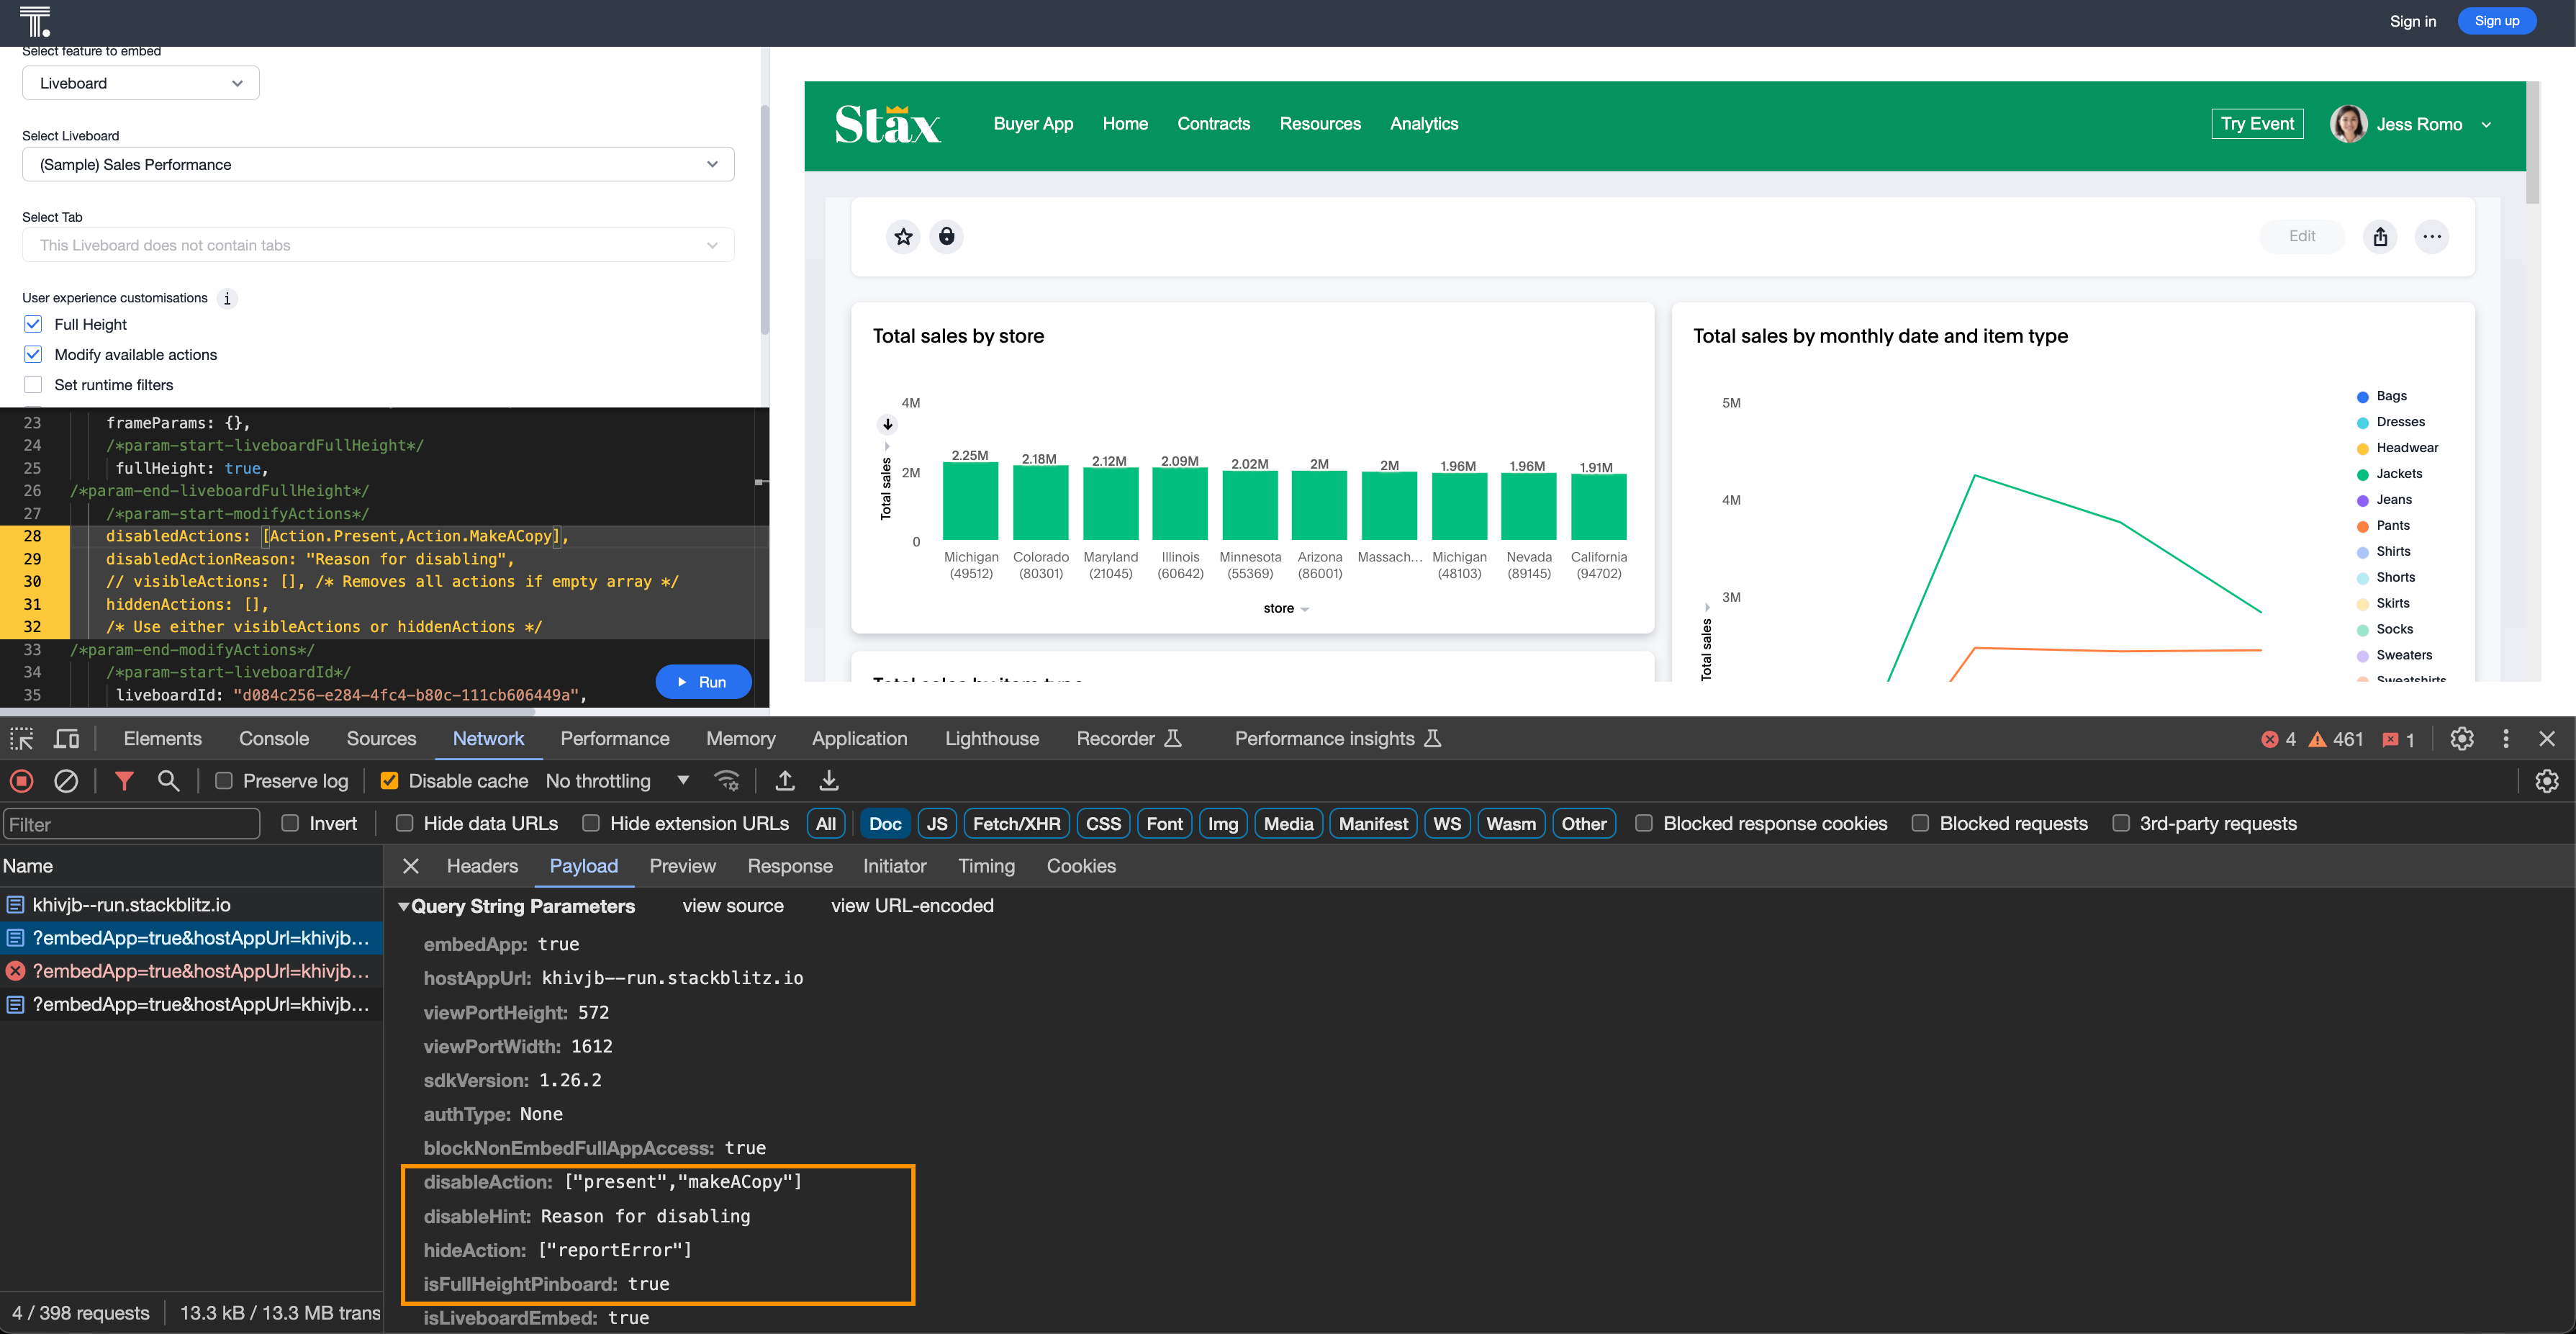
To customize ThoughtSpot components embedded in an iFrame, ThoughtSpot provides additional flags that you can pass as query parameters in the iFrame embedding URL.
| Parameter | Description |
|---|---|
| Array of strings. GUID of the data source object. Doesn’t allow multiple values in the array. |
| String. Defines if the data panel on the Search page should be shown in the expanded or collapsed mode. Allowed values are:
|
| Array of strings. Disables menu actions in the embedded view. For more information, see Actions. |
| String. Reason for disabling a menu action. |
| Array of strings. Hides menu actions in the embedded view. See Actions for allowed values. |
| Array of strings. GUIDs of the Liveboard tabs to hide in the embedded Liveboard view. |
| Boolean. If set to true, the embedded object container dynamically resizes according to the height of the Liveboard. |
| Boolean. Disables the in-product walkthroughs in the embedded view. |
| Boolean. Hides the Orgs drop-down in the full application embedded view. |
| Boolean. By default, the top navigation bar is hidden in the full application embedded view. You can use this flag to show or hide the top navigation bar when embedding full ThoughtSpot experience. |
| Boolean. Hides the user profile and help menu (?) icons in the full application embedded view. |
| String. Search query string in the natural language format. You can use this parameter to define a query string when embedding the Natural Language Search component. |
| Array of strings. Array of search keywords. For example, |
| String. GUID of the data source object to be used for Natural Language Search queries. |
| Array of strings. Lists the actions to show in the embedded view. See Actions for allowed values. |
| Array of strings. GUIDs of the Liveboard tabs to show in the embedded Liveboard view. |
You can also use the Visual Embed Playground in the Develop tab to customize, enable, or disable features in the embedded view and inspect the code to copy the URL.
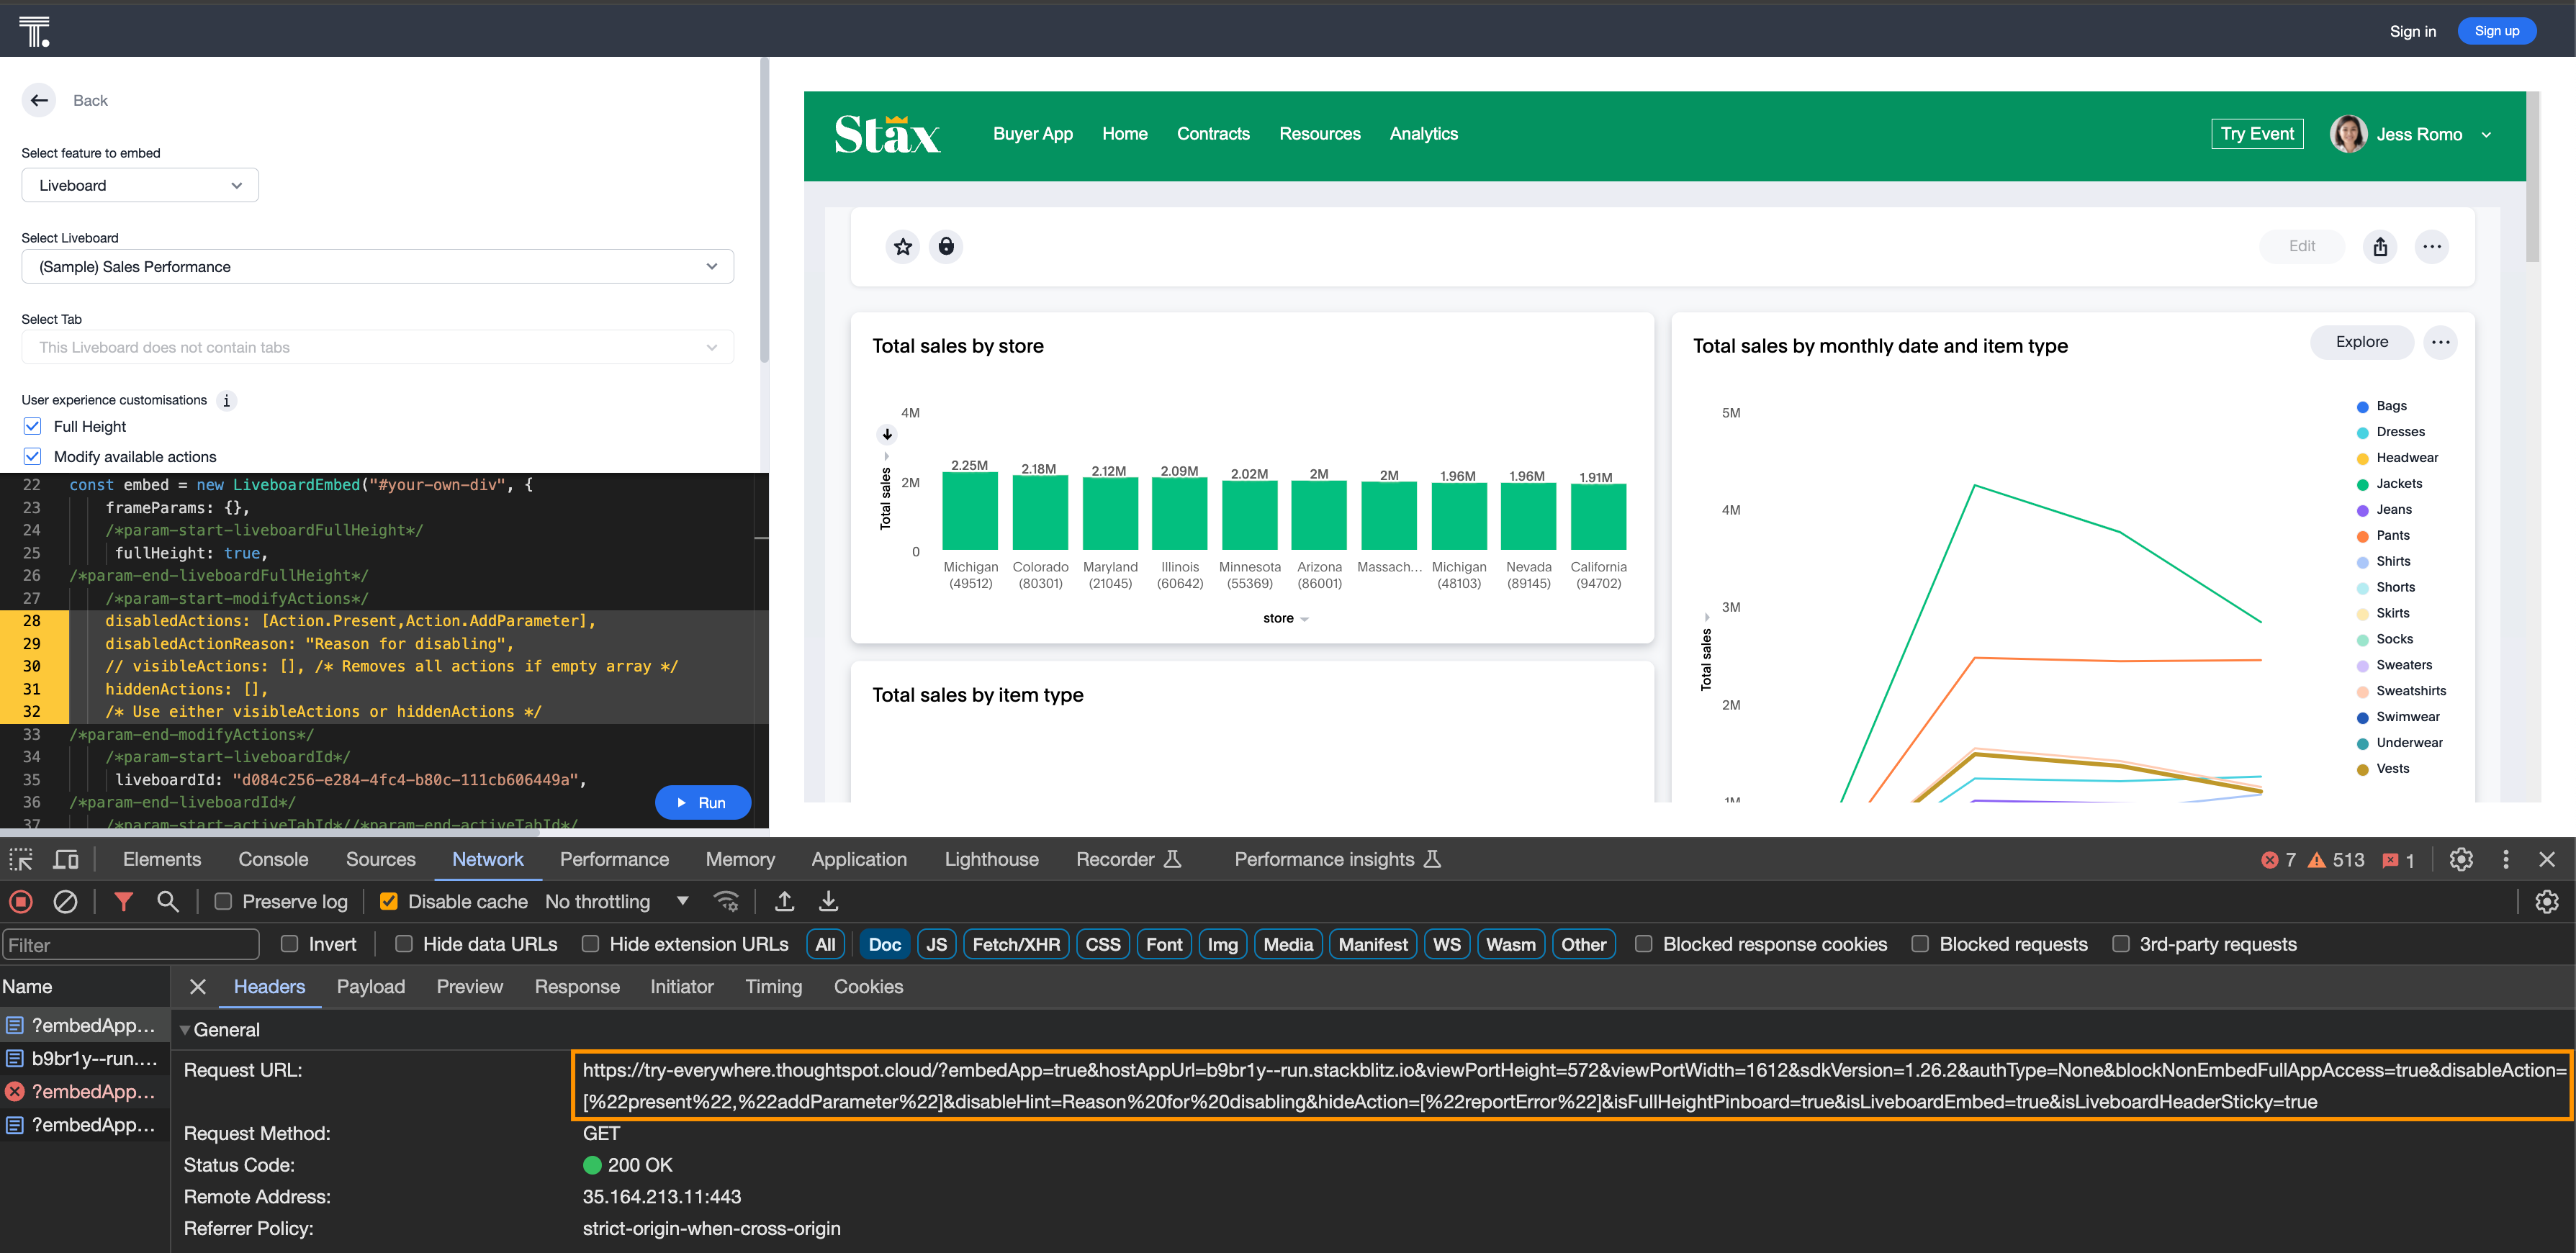
To copy the feature flags and query parameters, go to Network > Doc > Payload > Query String Parameters.
For a complete list of feature flags and parameters, see the following pages:
If you have configured ThoughtSpot to use the same SAML provider as your web application, you can create a simple html page to seamlessly embed a ThoughtSpot Liveboard or individual visualizations.
The following code example can be used to define the new page. It defines the iFrame, with the ThoughtSpot URL using a runtime filter to show data from a specific region:
<!DOCTYPE html>
<html lang="en">
<head>
    <meta charset="UTF-8">
    <meta name="viewport" content="width=device-width, initial-scale=1.0">
    <title>ThoughtSpot Liveboard iFrame Embed</title>
    <style>
        body {
            font-family: Arial, sans-serif;
            text-align: center;
            margin: 0;
            padding: 0;
            height: 100vh;
            display: flex;
            flex-direction: column;
            align-items: center;
            justify-content: center;
        }
        h1 {
            margin-bottom: 10px;
        }
        .iframe-container {
            width: 90vw;
            height: 90vh;
            max-width: 1400px;
            max-height: 900px;
        }
        iframe {
            width: 100%;
            height: 100%;
            border: none;
        }
    </style>
</head>
<body>
    <h1>ThoughtSpot Liveboard iFrame Embed</h1>
    <div class="iframe-container">
        <iframe
        src="https://{thoughtspot-server}/?embedApp=true&p&{field_name}=Region&op1=EQ&val1={field_value}&orgid={org_id}>#/embed/viz/{liveboard_guid}">
        </iframe>
    </div>
</body>
</html>|
Note
|
Variable substitution required
|
Create a ThoughtSpot plugin for your hosting platform, for example, SharePoint, WordPress. In the plugin context, the platform can provide more flexibility for adding custom Javascript.
Create a proxy to forward requests from the embedded iFrame to ThoughtSpot after adding the necessary authentication.
Use Liveboard REST API to pull only the data values and then render them in your app.
For mobile apps, it’s easier to use the Liveboard REST API to pull only the data values and then render them using a table or charting library native to the mobile platform.