
Webhooks UI
Table of Contents
The Develop page in ThoughtSpot UI provides the option to configure and manage webhooks.
Webhook configuration and management (New experience)🔗
The Webhooks option on the Develop page allows you to access the new Webhooks experience. This page provides a centralized interface with menu actions to create, edit, delete, enable, or disable a webhook, send test events, view delivery status and logs.
|
Important
|
|
Webhooks list page🔗
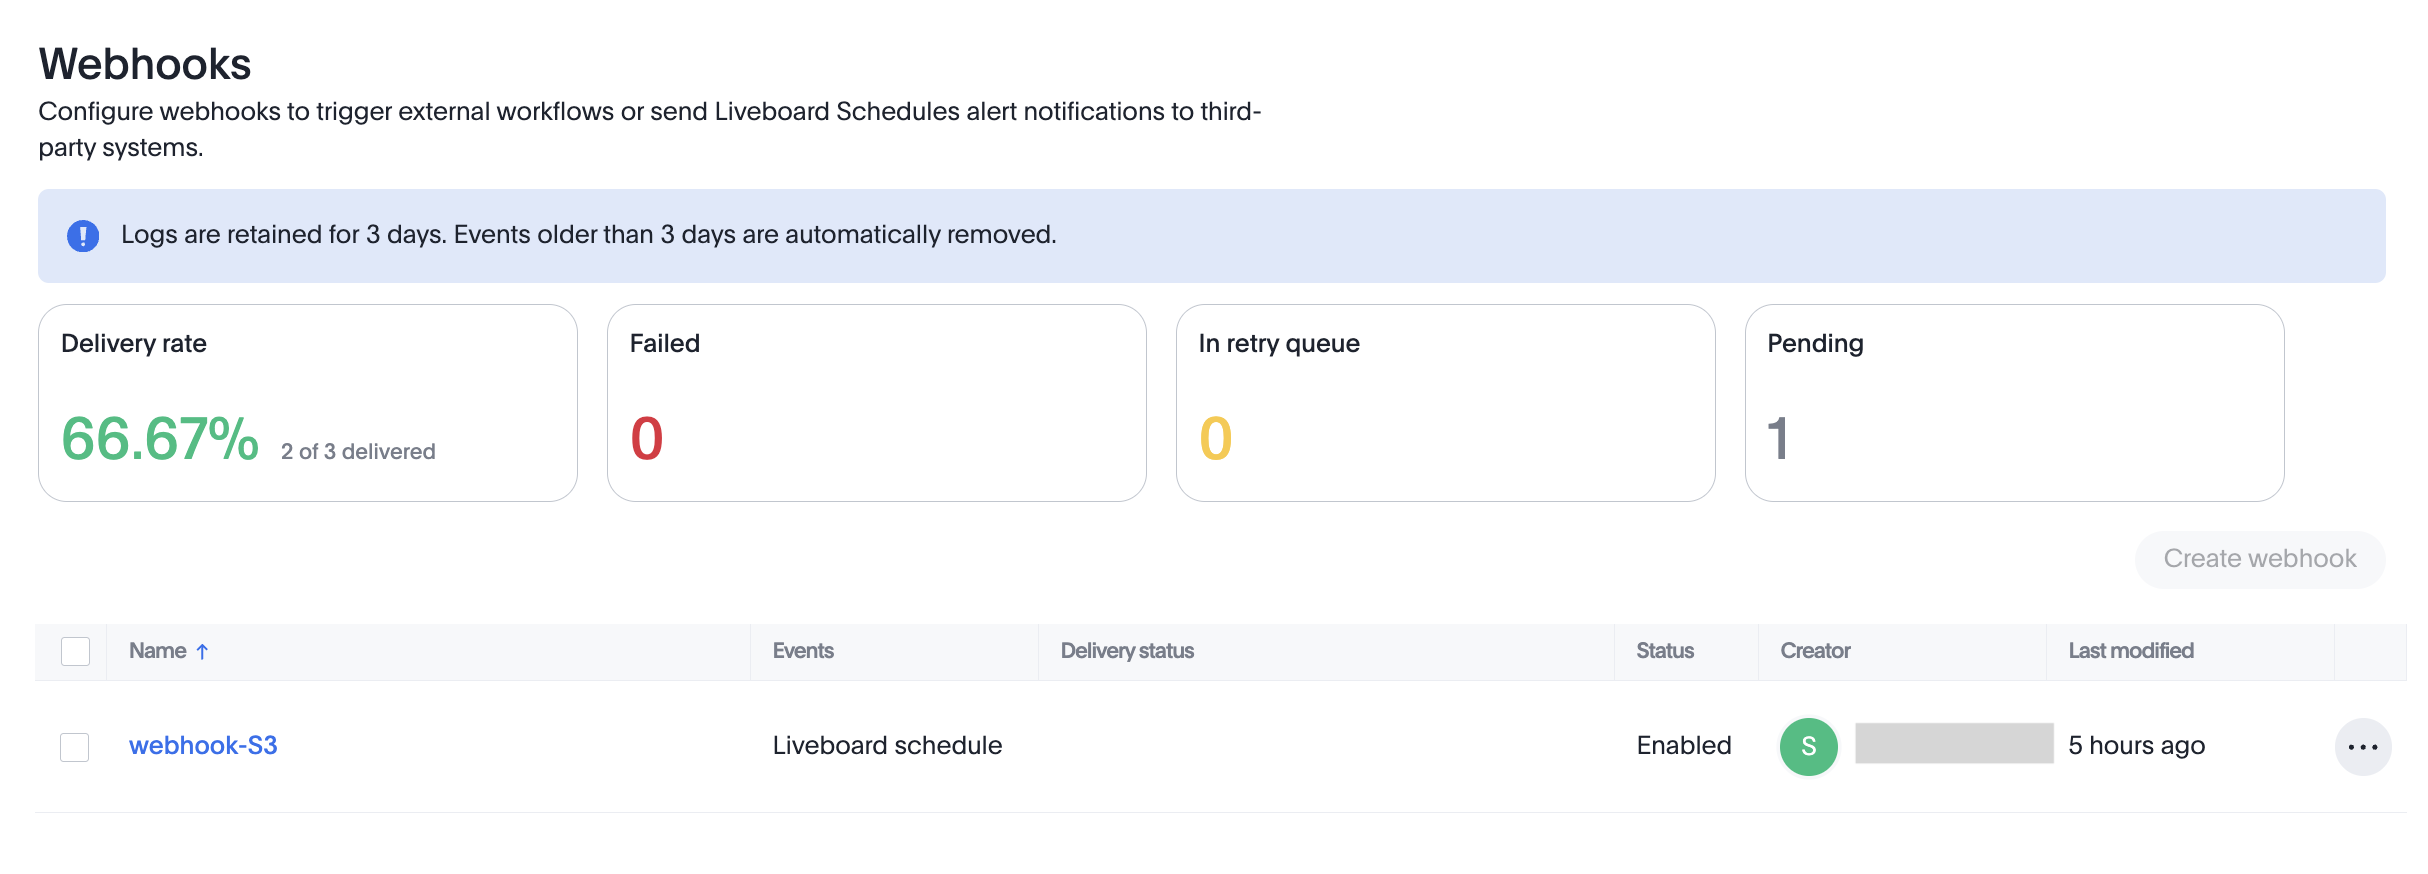
The webhooks list includes the following columns:
-
Name: Display name of the webhook.
-
Events: ThoughtSpot event types the webhook is subscribed to, such as
LIVEBOARD_SCHEDULE. -
Delivery status: Summary of recent delivery outcomes for the webhook.
-
Status: Current activation state of the webhook: Enabled or Disabled. Use the toggle to change the state without editing the webhook.
-
Creator: ThoughtSpot user who created the webhook.
-
Last modified: Date and time the webhook configuration was last updated.
Note that ThoughtSpot allows only one webhook for the Liveboard Schedule event type per Org.
The actions available for the list items include:
-
Sort: Click any column header to sort the webhook list by that column.
-
Bulk selection: Select multiple webhooks using the checkboxes to perform bulk actions.
-
Row-level actions: Hover over a webhook row and click the actions menu (…) to edit, delete, test, enable, or disable the webhook connection.
The following figure shows the Webhooks list and dashboard cards.
For each item in the webhooks list, the following actions are available:
-
Edit: Opens the webhook edit panel.
-
Enable: Enables selected webhooks.
-
Disable: Disables selected webhooks.
-
Send test event: Sends a test payload to all selected webhook endpoints.
-
Delete: Deletes the selected webhooks.
To enable, disable, edit, or delete the webhook configuration, select the webhook in the list, and use the options available in the More options (…) menu.
Creating a webhook connection🔗
The Create webhook option allows you to create a webhook for the Liveboard schedule event type. Only one webhook can be created per Org.
The webhook creation workflow allows configuring webhook properties, including authentication parameters, storage destination, signature verification, custom headers, and URL parameters.
You can create a webhook for the Liveboard schedule event type to send a lightweight JSON payload and also send these as reports to a Cloud Storage destination in the file format supported by the Liveboard scheduled jobs.
For more information, see the following documentation:
Update webhook connection status🔗
The webhook connections are automatically enabled when they are created in the UI or via the API. To update the webhook status, use the Disable and Enable options either in More options menu (…) or the buttons that appear above the list when a webhook row is selected.
Testing a webhook connection🔗
To verify a webhook connection:
-
Use one of the following options to send a test event:
-
Select the webhook and click Send test event.
-
In the webhook row, from the More options menu (
…), click Send test event.
-
-
To view the delivery status, click the webhook and view the webhook event log.
Editing a webhook connection🔗
To edit webhook properties:
-
Use one of the following options to open the edit panel:
-
Select the webhook and click Edit.
-
In the webhook row, from the More options menu (
…), click Edit.
-
-
Update the fields as required.
-
Click Save.
|
Note
|
To clear an authentication, signature verification, or storage destination configuration entirely without replacing it, you can use the |
Deleting a webhook🔗
-
Hover over the webhook row and click the actions menu (…).
-
Select Delete.
-
Confirm the deletion in the prompt that appears.
Deleting a webhook is permanent. Delivery logs associated with the webhook are removed when they reach the 3-day retention limit.
Monitoring webhook status🔗
The Webhooks page provides a dashboard view with cards indicating the delivery statistics. The cards refresh when the page is reloaded.
-
Delivery rate: Percentage of webhook delivery attempts that succeeded.
-
Failed: Total count of delivery attempts that failed or resulted in an error.
-
In Retry Queue: Count of delivery attempts currently queued for retry.
-
Pending: Count of delivery attempts awaiting dispatch.
To view delivery status of a specific webhook, click the webhook to open the delivery details page.
To filter the list, click Add filter and select any of the following options:
-
Delivery status: Filters the webhooks list by their delivery status.
-
Sent: Allows filtering the list by webhook deliveries that were sent in the last 1, 2, 4, or 8 hours, or the last 1, 2, or 3 days.
By default, logs are retained for 3 days. If you want to store and retrieve logs for more than 3 days, contact ThoughtSpot Support.
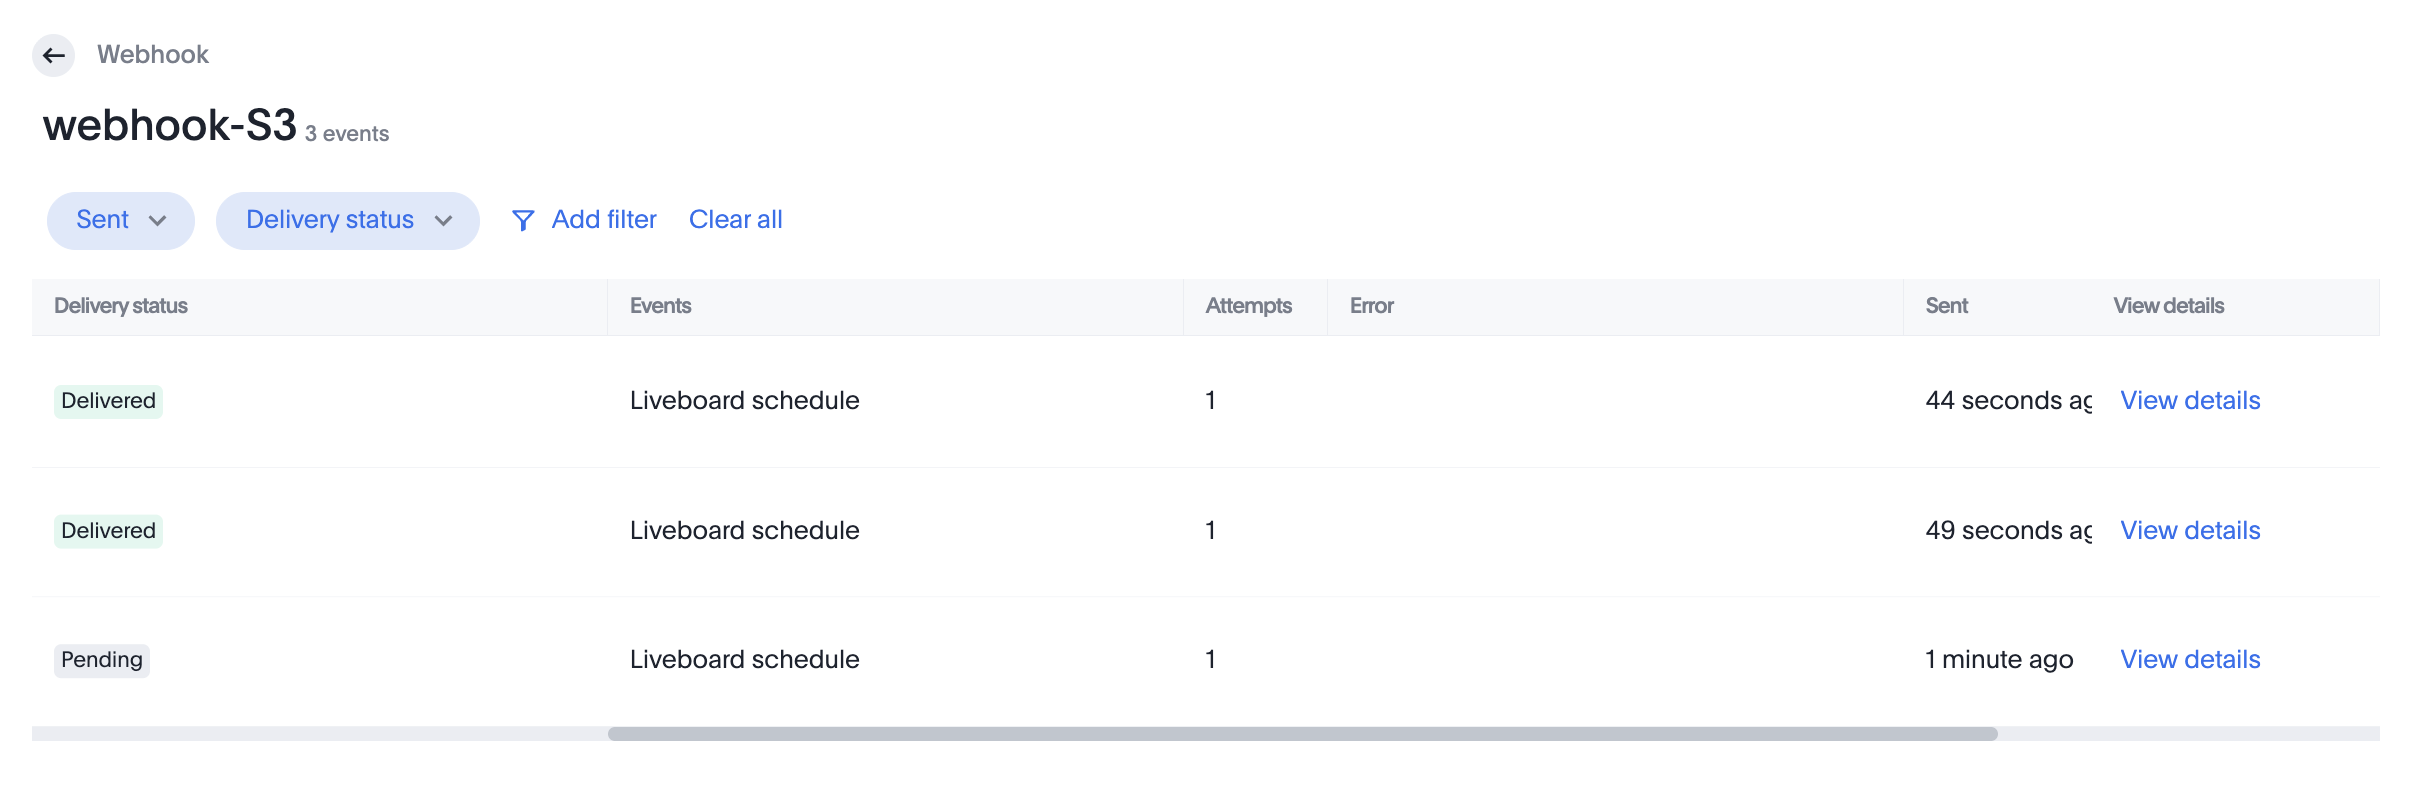
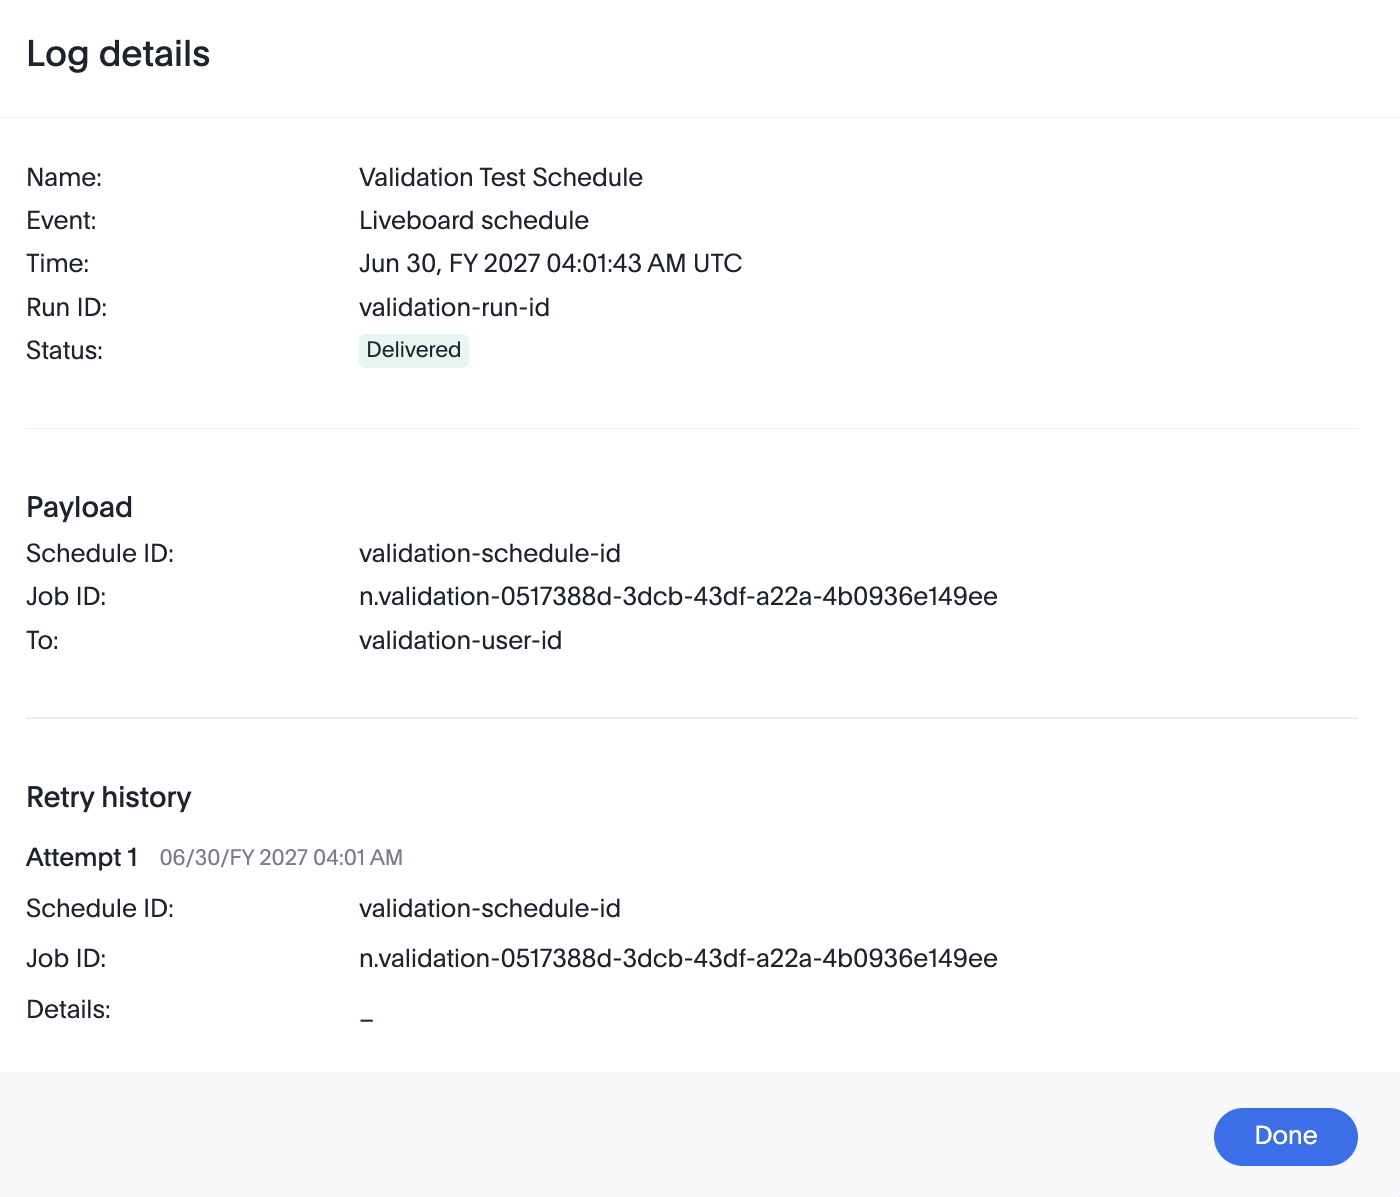
To view the log details of a specific webhook delivery, click View details. The Log details modal shows details such as the event name, type, timestamp, ID, delivery status, payload properties, and retry history.
Webhook configuration and management (Legacy experience)🔗
The Legacy webhooks option in the Develop > Customizations page provides access to webhooks created for KPI monitor alerts. These webhooks are managed separately from the new Webhooks experience.
Accessing legacy webhooks🔗
To access the legacy webhook configuration:
-
Navigate to the legacy webhooks page in the Develop section of the ThoughtSpot UI.
-
The page displays the list of webhooks registered for KPI monitor alerts.
Creating a webhook for KPI alerts🔗
To create a webhook for KPI monitor alerts:
-
On the webhooks page, click Create webhook.
-
Enter a display name and the fully qualified URL of the webhook endpoint.
-
Configure the authentication method required by your destination endpoint.
-
Click Save.
After saving, the webhook appears in the list and can be selected as a custom notification channel when creating or editing a KPI monitor alert. For more information, see Webhooks for KPI monitor alerts.
Actions available for legacy webhooks🔗
For each webhook in the list, the following actions are available:
-
Edit: Update the webhook name, URL, or authentication settings.
-
Delete: Permanently remove the webhook from ThoughtSpot.
|
Note
|
Legacy webhooks for KPI alerts are separate from the Liveboard schedule webhooks managed through the new Webhooks page. KPI alert webhooks are not subject to the one-per-Org limit that applies to Liveboard schedule webhooks. |