init({
  thoughtSpotHost: 'Your-ThoughtSpot-Host', // (Required) The URL of your ThoughtSpot instance
  authType: AuthType.None, // (Required) Authentication type; 'None' is for development/testing only
  // Pass custom variables for Pendo
  customVariablesForThirdPartyTools: {
    pendoKey: 'your-key', // Pendo API key or client key
    pendoVisitorConfig: { // Pendo visitor (user) metadata
      id: 'user-id',      // User ID
      name: 'user-name'   // User's display name
    },
    pendoAccountConfig: { // Pendo account (organization) metadata
      id: 'account-id',   // ID of the Pendo account
      name: 'account-name'// Display name of the Pendo account
    }
  },
});Integrate Pendo with ThoughtSpot Embed
Table of Contents
- Before you begin
- Step 1: Sign in to your Pendo Account
- Step 2: Create an integration script
- Step 3: Host the script on a public site
- Step 4: Contact ThoughtSpot Support to enable integration
- Step 5: Add the Script source to the CSP Allowlist
- Step 6: Define custom variables in the Visual Embed SDK
- Step 7: Validate and test Pendo integration
- Troubleshooting
- Additional resources
To launch Pendo guides and analytics within your ThoughtSpot embed, you must integrate Pendo with your embed environment. This integration typically requires adding a custom JavaScript to enable product tours, feature announcements, and usage tracking within the embedded experience.
|
Important
|
|
Before you begin🔗
Pendo integration with ThoughtSpot embed requires the following:
-
Access to Pendo
If you do not have a Pendo account, you can sign up for Pendo and create a trial account. -
Access to a ThoughtSpot instance. You need administrator privileges to enable Pendo integration.
-
Approval from ThoughtSpot Support for Pendo integration.
-
A publicly accessible domain to host your integration script.
Step 1: Sign in to your Pendo Account🔗
To integrate Pendo in your ThoughtSpot embed, you’ll require a script. Before creating your integration script:
-
Sign in to your Pendo account.
-
Identify the information you want to capture.
-
Define visitors and accounts, and segment data.
-
Review your existing Pendo implementation in your application to understand how you initialize Pendo (for example, using a React hook, vanilla JavaScript, or other methods).
The above information will be used as metadata in the Pendo install script. For more information, refer to the Pendo Documentation.
Step 2: Create an integration script🔗
The integration requires a script that is designed to install and initialize the Pendo agent within your embed environment.
|
Important
|
Create your own integration script: ThoughtSpot strongly recommends that you replicate your own Pendo initialization logic within your own externally hosted JavaScript file for easier management and maintenance. This approach ensures consistency with your existing Pendo implementation and allows you to adapt it to your specific requirements. The sample JavaScript provided by ThoughtSpot is an example only and may not work for all use cases, particularly in cookieless environments or when using custom authentication flows. |
The integration script typically includes the following components:
-
A JavaScript function that includes the initialize method required to retrieve, activate, and load the Pendo agent,
pendo.js. -
The Pendo client key that is unique to each customer account. It maps the metadata to your Pendo subscription.
-
Pendo visitor configuration that identifies the user (visitor).
-
Pendo account configuration that identifies the account (organization or user group) to which the user belongs
The client key and configuration metadata for the Pendo visitor and account must be passed to the script via the customVariablesForThirdPartyTools object in the Visual Embed SDK to identify users and accounts for tracking, segmentation, and personalized experiences within Pendo.
For more information about the Pendo configuration metadata, script creation and its components, refer to the following articles in the Pendo documentation:
Sample JavaScript for Pendo integration🔗
To assist you with the Pendo integration process, ThoughtSpot provides a sample JavaScript, pendoIntegrationScript.js, as a reference example only. You can find this sample JavaScript in the ThoughtSpot Developer examples GitHub repository.
|
Note
|
This sample script is provided for reference purposes. It demonstrates how to:
However, you should create your own script that replicates your application’s Pendo initialization logic. For example, if your application uses a React hook to call |
Step 3: Host the script on a public site🔗
When your integration script is ready, host it on a publicly accessible domain, such as AWS S3, Azure Blob, GitHub, or a trusted CDN. The script must be accessible to ThoughtSpot so it can fetch and inject it into the embed iframe.
Note the hosting domain and ensure the script URL is publicly accessible.
|
Note
|
If you anticipate frequent updates to the script, choose a hosting service that allows content overrides without changing the URL. If you use the same hosting URL, you don’t need to request approval from Support each time the script is modified. |
Step 4: Contact ThoughtSpot Support to enable integration🔗
Create a ThoughtSpot Support request to enable Pendo integration with your ThoughtSpot Embed.
In your support request:
-
Specify the exact domain that will host your script in the embedding environment. Send the full URL path, including the
.jsextension. -
Send the script that you want to integrate.
Wait for ThoughtSpot Support to validate and approve your request. This step is required to ensure that only scripts from the vetted domain are allowed to run in your embed environment.
Step 5: Add the Script source to the CSP Allowlist🔗
After ThoughtSpot enables the integration for your instance, you must add your script’s hosting domain to the Content Security Policy (CSP) allowlist to ensure ThoughtSpot can fetch and execute your script:
-
Log in to your ThoughtSpot instance as an administrator.
-
Go to the Develop page.
If your instance has Orgs, switch to the All Orgs context. -
In the Customizations section, click Security Settings.
-
Check whether the CSP script-src domains setting is visible on the Security Settings page.
-
Add the domain that hosts your script to the CSP script-src allowlist.
This step is required to allow ThoughtSpot to fetch your script from the hosting domain and inject it into the embed iframe.
Step 6: Define custom variables in the Visual Embed SDK🔗
Define the required variables in init () configuration of your embed code.
To pass the variables to your script, use the customVariablesForThirdPartyTools object in the Visual Embed SDK.
The customVariablesForThirdPartyTools object allows you to securely pass variables, such as API keys and user/account information, to scripts loaded in the embed context.
Note that these variables include private information such as credentials or keys. The integration script will read these variables from the global window object (window.tsEmbed).
Add the following variables in the init() configuration:
-
pendoClientKey
The API key or client key to initialize Pendo -
pendoVisitorConfig
The object containing Pendo visitor (user) metadata -
pendoAccountConfig
The object containing Pendo account (organization) metadata
The script will include the following code to access these variables via the window.tsEmbed object and initialize the Pendo agent in your ThoughtSpot embed environment.
const pendoKey = window.tsEmbed.pendoKey;
const pendoVisitorConfig = window.tsEmbed.pendoVisitorConfig; // Make sure to pass at least the id and name in the customVariablesForThirdPartyTools
const pendoAccountConfig = window.tsEmbed.pendoAccountConfig; // Make sure to pass at least the id and name in the customVariablesForThirdPartyTools
When the SDK initializes and the authentication is completed successfully, your hosted JavaScript will run seamlessly in your ThoughtSpot embed environment.
Step 7: Validate and test Pendo integration🔗
To validate and test Pendo integration in your embed:
-
Log in to your embedded ThoughtSpot application as an end user.
-
Open browser dev tools and verify if the network requests are being sent to Pendo.
-
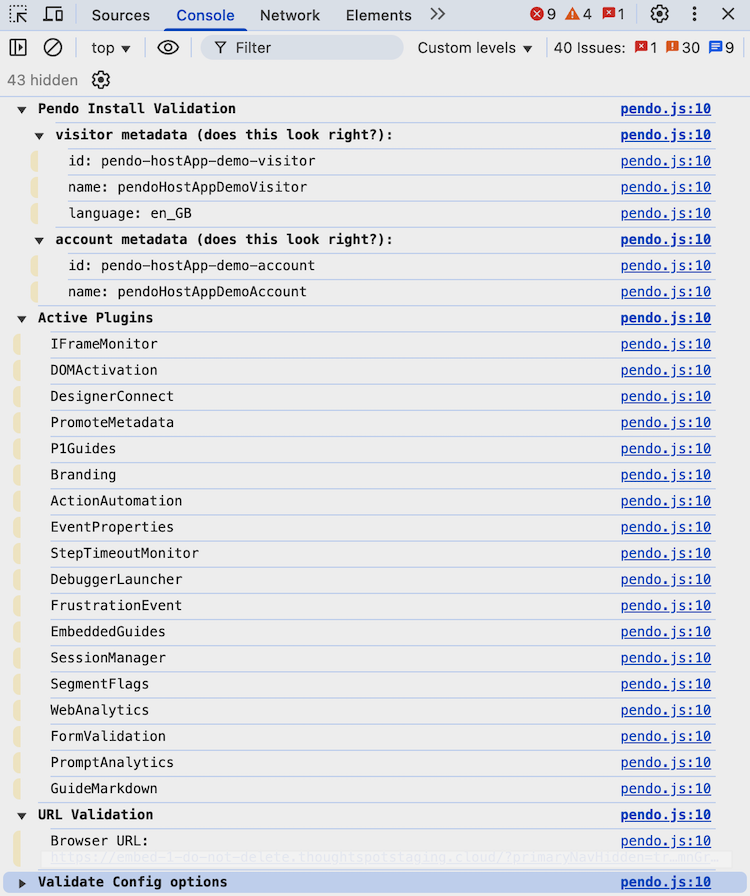
If your integration script includes validation checks with
pendo.validateEnvironment(), you can verify the logs in the console to confirm if the script is executed successfully and initializes as expected. You can also enable debug logs by addinglogLevel: LogLevel.DEBUGto yourinitcode.
For more information aboutpendo.validateEnvironment(), see the "Verify the installation" section in the Pendo Documentation or refer to the sample script provided by ThoughtSpot. -
Log in to Pendo to create a sample guide for your ThoughtSpot application instance.
-
In the ThoughtSpot UI, verify if the Pendo guide is published.
In the following figure shows the sample Pendo element assigned to the information badge next to Watchlist on the ThoughtSpot Home page: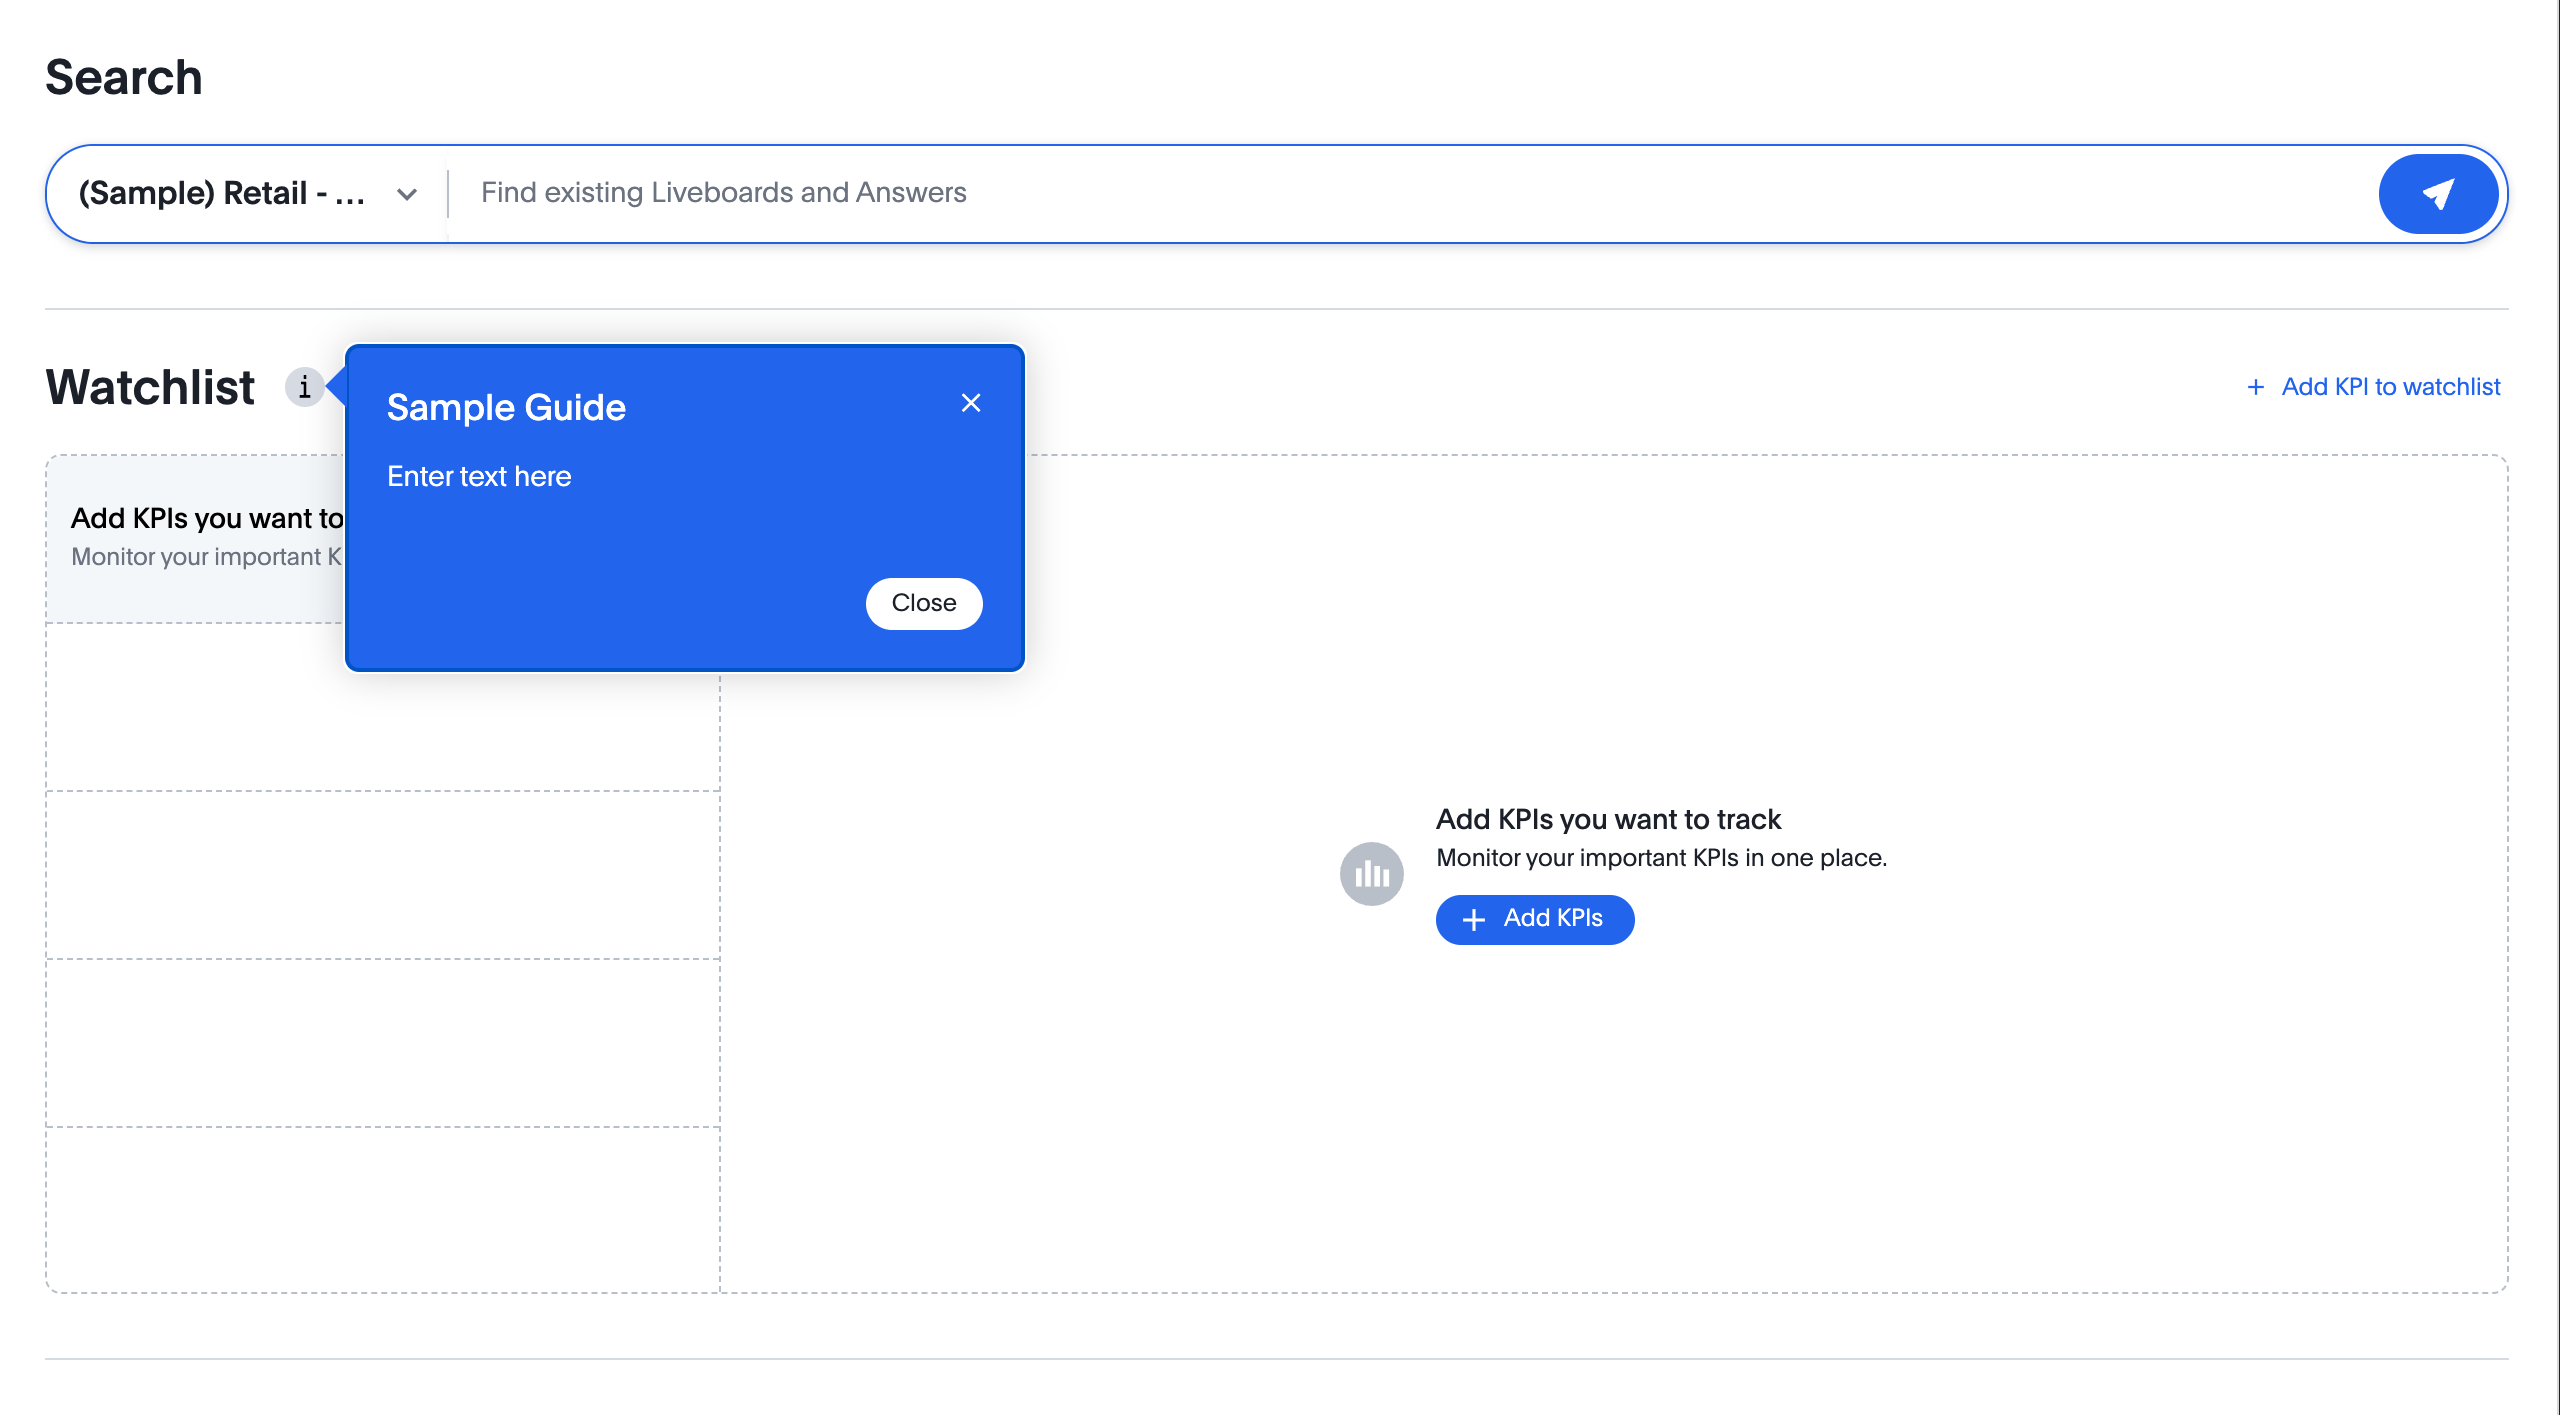
Troubleshooting🔗
If the script is not loading:
-
Check the browser console for CSP or network errors.
-
Check the CSP allowlist in ThoughtSpot to ensure the domain hosting URL is allowed.
If the variables are not available:
-
Check if the SDK is initialized and the variables are passed in the
customVariablesForThirdPartyToolsobject in theinit()function in the SDK. -
Check whether your script can access the
window.tsEmbedobject after the embed has initialized.