npm install @thoughtspot/react-native-embed-sdkEmbed using React Native mobile SDK
Table of Contents
ThoughtSpot’s React Native Mobile Embed SDK enables developers to embed ThoughtSpot Analytics in their mobile apps. This SDK is designed for the React Native framework to allow developers to build their mobile apps that operate on iOS and Android platforms, using native resources and a single codebase.
In its initial release, the React Native Embed SDK supports embedding a Liveboard component and customizing the embed view within the mobile app.
Before you begin🔗
Before you begin, check the following:
-
NPM and Node.js are installed on your system.
-
Your React Native environment is set up.
-
You can access a ThoughtSpot instance with administrator and developer credentials.
-
You have access to the Liveboard object that you want to embed
-
If you are using Expo to build your application:
-
Ensure that the Expo project is created and imported into your development environment.
-
Install the Expo Go app on your mobile device (iOS or Android) to preview the app.
-
Get started with embedding🔗
This section provides a set of steps to quickly embed a ThoughtSpot Liveboard in a React Native mobile app.
Install the SDK🔗
The latest version of the Mobile Embed SDK for React Native is available at https://www.npmjs.com/package/@thoughtspot/react-native-embed-sdk.
Import the SDK into your project🔗
 // NPM
 import { LiveboardEmbed, AuthType, init } from '@thoughtspot/react-native-embed-sdk';
After you import, you can define the ThoughtSpot host URL from which you want to embed a Liveboard, authentication type and attributes, and Liveboard ID.
Initialize the SDK and set up authentication🔗
Define the following parameters:
-
thoughtSpotHost
The hostname of your ThoughtSpot application instance. For example,team2.thoughtspot.cloud. See FAQs to know how to find the hostname of your application instance. -
authType
Authentication type. In the current version, mobile embedding supports only the Cookieless Trusted authentication method (AuthType.TrustedAuthTokenCookieless).
init({
    thoughtSpotHost: 'ts-host-url', // Replace with your ThoughtSpot host URL
    authType: AuthType.TrustedAuthTokenCookieless,
    // Callback to fetch a login token from your backend token service
    getAuthToken: () => {
        // Call your backend endpoint to get a ThoughtSpot login token
        return fetch('https://my-backend.app/ts-token') // Replace with your backend token endpoint
            .then((response) => response.json()) // Parse JSON response
            .then((data) => data.token); // Return the token value
    }
    // You can also use this code for testing with a custom time token:
    // getAuthToken: async () => "full-auth-token"  // Replace "full-auth-token" with logic to fetch the token from your backend. For more information, see https://developers.thoughtspot.com/docs/trusted-auth-sdk#_code_examples
});
Add the Liveboard component🔗
const TsApp = () => {
  return (
    <View style={styles.container}>
    <LiveboardEmbed
        liveboardId="liveboard-id" // Replace it with your Liveboard ID
    />
    </View>
  );
};
Customize your embed🔗
Just like the Visual Embed SDK for web application embed, the Mobile Embed SDK provides the following customization options:
-
Control the visibility of menu actions in the embedded view
-
Customize app interactions and workflows using events.
-
Customize the styles and UI layout of the embedded view
Customize menu actions🔗
By default, the SDK includes a set of menu actions in the embedded Liveboard view.
To disable or hide a menu action, you must specify the action ID in the disabledActions, visibleActions, or hiddenActions array.
|
Note
|
To show or hide menu actions, use either |
//Add the menu actions to show in the embed view. Removes all actions if the array is empty
visibleActions: [Action.AddFilter,Action.Share,Action.DrillDown,Action.AxisMenuFilter,Action.AxisMenuTimeBucket],
//disable actions
disabledActions: [Action.DrillDown, Action.Edit],
//specify the reason for disabling menu actions
disabledActionReason: "Contact your administrator to enable this feature",
//hiddenActions: [], /* Do not use if `visibleActions` is enabled */
//hide specific actions
hiddenActions: [Action.AddFilters],
//disable actions
disabledActions: [Action.DrillDown],
//specify the reason for disabling menu action
disabledActionReason: "Contact your administrator to enable this feature",
//visibleActions: [], /* Do not use if `hiddenActions` is enabled */Customize app interactions🔗
To customize app interactions and enable custom workflows with Embed and Host events.
The following code shows how to register the authInit and load embed event and handle response to these events:
// Define a component that embeds a Liveboard and handles initial authentication state
const LiveboardEmbedView = () => {
  // Declare a loading state to control the loading UI
  const [loading, setLoading] = useState(true);

  // Create a ref to interact with the LiveboardEmbed component programmatically
  const webViewRef = useRef<any>(null);

  // Function to handle the AuthInit event from the LiveboardEmbed
  const handleAuthInit = () => {
    alert("Auth Init EmbedEvent"); // Show a simple alert when auth is initialized
    setLoading(false);  // Set loading to false once authentication is complete
  }

  return (
    <>
      {loading && <Text>Loading...</Text>}
      <LiveboardEmbed
        ref={webViewRef}
        liveboardId={liveboardId} // Pass the Liveboard ID
        onAuthInit={() => {handleAuthInit()}} // Callback when the AuthInit event is fired by the embed
      />
    </>
  );
};
Similarly, you can also add a host event to trigger an action or add custom workflow.
The following example shows the HostEvent.Reload and HostEvent.Share to trigger a reload action and open the Share dialog when the Share button is clicked:
// Define a component for embedding and interacting with a Liveboard
const LiveboardEmbedView = () => {
  // Create a reference to the LiveboardEmbed instance
  const webViewRef = useRef<any>(null);

  // Function to reload the embedded Liveboard
  const reloadView = () => {
    Alert.alert("Reloading") // Show an alert to inform the user
    if(webViewRef?.current) {
      // Trigger the Reload event on the Liveboard
      webViewRef?.current?.trigger(HostEvent.Reload)
    }
  }

  // Function to open the Share dialog for the Liveboard
  const shareView = () => {
    if(webViewRef?.current) {
      // Trigger the Share event on the Liveboard
      webViewRef.current.trigger(HostEvent.Share)
    }
  }

  // Render buttons for "Reload" and "Share", and the LiveboardEmbed component
  return (
    <>
      <View>
        <TouchableOpacity onPress={reloadView}>
          <Text>Reload</Text>
        </TouchableOpacity>
        <TouchableOpacity onPress={shareView}>
          <Text>Share</Text>
        </TouchableOpacity>
      </View>
      <LiveboardEmbed
        ref={webViewRef}  // Assign the ref to control this component
        liveboardId={liveboardId} // Pass the Liveboard ID
      />
    </>
  );
};
Customize styles🔗
You can use ThoughtSpot’s CSS customization framework to customize the text strings, icons, styles and the UI layout of the embedded view.
init({
    // Other attributes such as the host URL, authentication type and so on.
    customizations: {
        content: {
            strings: {
                // Custom label for the Filter menu action
                "Filter": "Select column",
            }
        },
        style: {
            customCSS: {
                variables: {
                    // Background color of the application
                    "--ts-var-root-background": "#fef4dd",
                    // Text color
                    "--ts-var-root-color": "#4a4a4a",
                    // Visualization title color
                    "--ts-var-viz-title-color": "#8e6b23",
                    // Font family for visualization title
                    "--ts-var-viz-title-font-family": "'Roboto', 'Helvetica', sans-serif",
                    // Title text capitalization
                    "--ts-var-viz-title-text-transform": "capitalize",
                    // Visualization description text color
                    "--ts-var-viz-description-color": "#6b705c",
                    // Font family for description text
                    "--ts-var-viz-description-font-family": "'Roboto', 'Helvetica', sans-serif",
                }
            }
        }
    }
});
Build your app and preview the embedded content🔗
Build your app:
$ npm run buildIf you are using an Expo project:
-
Build your project locally
expo start -
Scan the QR code with the Expo Go app to see the app with the embedded content.
Code samples🔗
The following example shows the minimum code required to embed a Liveboard successfully in a mobile app:
import React from 'react';
import { View, StyleSheet } from 'react-native';
// Import necessary ThoughtSpot SDK modules
import { AuthType, init, LiveboardEmbed } from '@thoughtspot/react-native-embed-sdk';
// Initialize the ThoughtSpot SDK
init({
thoughtSpotHost: 'ts-host-url', // Replace with your ThoughtSpot host URL
authType: AuthType.TrustedAuthTokenCookieless, //Cookieless trusted token authentication
getAuthToken: async () => "full-auth-token", //fetch a valid authentication token. See
});
// Add Liveboard component
const TsApp = () => {
return (
<View style={styles.container}>
<LiveboardEmbed
liveboardId="liveboard-id" // Pass the Liveboard ID
onError={(error) => console.error('Embed error:', error)} // Log any embed errors
/>
</View>
);
};
// Define layout styles
const styles = StyleSheet.create({
container: {
flex: 1, // Takes up full screen height
marginTop: 50, // Add some space from the top
marginBottom: 30, // Add some space at the bottom
},
});
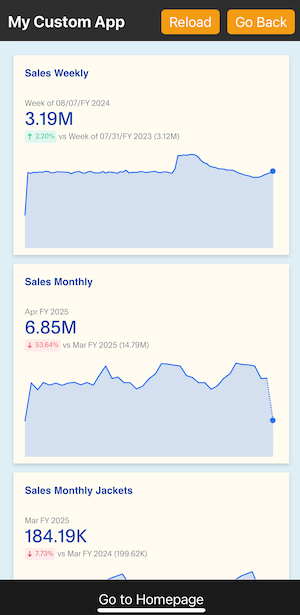
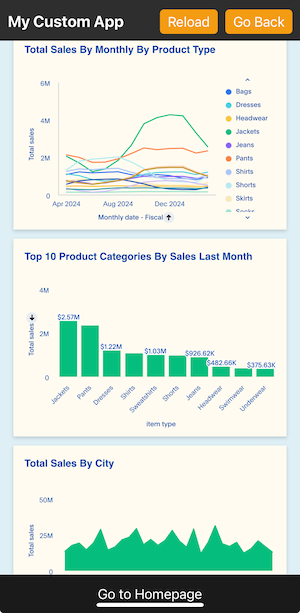
export default TsApp; // Export the Liveboard componentIn the following code sample, the embedded view is customized to show only Drill down (Action.DrillDown), Add filter (Action.AddFilter), and Share actions. This code also includes embed events that register event listeners or host events to trigger a response from the app.
import React, { useRef, useState } from 'react';
import { StyleSheet, View, Text, Alert, TouchableOpacity } from 'react-native';
// Import ThoughtSpot SDK components and helpers
import { Action, HostEvent, LiveboardEmbed, init, AuthType } from '@thoughtspot/react-native-embed-sdk';

// Initialize the ThoughtSpot SDK
init({
  thoughtSpotHost: 'ts-host-url', // Replace with your ThoughtSpot host URL
  authType: AuthType.TrustedAuthTokenCookieless, // Using cookieless trusted token authentication
  getAuthToken: async () => "full-auth-token", // Fetch authentication token
});

// Custom components to display and interact with the ThoughtSpot Liveboard
const LiveboardView = ({ liveboardId }) => {
  const [loading, setLoading] = useState(true); // State to track loading (optional)
  const webViewRef = useRef(null); // Ref to access the LiveboardEmbed instance

  // Reloads the liveboard when called
  const reloadView = () => {
    Alert.alert("Reloading")
    if (webViewRef?.current) {
      webViewRef.current.trigger(HostEvent.Reload);
    }
  };
  // Triggers the Liveboard sharing action
  const shareView = () => {
    if(webViewRef?.current) {
      webViewRef.current.trigger(HostEvent.Share)
    }
  };

  return (
    <View style={styles.embedContainer}>
      {/* The embedded ThoughtSpot Liveboard view */}
      <LiveboardEmbed
        ref={webViewRef}
        liveboardId={liveboardId}
        onAuthInit={() => setLoading(false)} // If authentication is successful
        onError={(error) => Alert.alert("Error", `Error: ${JSON.stringify(error)}`)} // Handle embed errors
        onLiveboardRendered={() => Alert.alert("Success", "Liveboard Rendered")} // Notify when Liveboard is rendered
        visibleActions={[Action.DrillDown, Action.AddFilter, Action.Share]} // Showm menu actions
        fullHeight={true}
      />
      {/* Optional control buttons */}
      <TouchableOpacity onPress={reloadView} style={styles.button}>
        <Text style={styles.buttonText}>Reload View</Text>
      </TouchableOpacity>
      <TouchableOpacity onPress={shareView}>
        <Text>Share</Text>
       </TouchableOpacity>
    </View>
  );
};

// Component that renders the LiveboardView
const TsApp = () => {
  return (
    <View style={styles.container}>
      <LiveboardView liveboardId="liveboard-id" /> // Pass the Liveboard ID
    </View>
  );
};

// Define layout styles
const styles = StyleSheet.create({
    container: {
        flex: 1, // Takes up full screen height
        marginTop: 50,
        marginBottom: 30,
    },
});

// Export the component
export default TsApp;
Test your app🔗
-
Connect your device to the app, authenticate, and load the Liveboard in your mobile app.

-
If you see a blank screen:
-
Ensure that your ThoughtSpot host URL is correct and accessible
-
Check if the authentication credentials in your code are valid
-
-
Check if the Liveboard renders with all its charts and tables. If the content is not loading, check if your code has the correct Liveboard ID. Additionally, you can add a listener for
EmbedEvent.Errorand verify the logs. -
In case of rendering issues, adjust the frame size constraints and rerun your app.
-
Check if your custom CSS specifications are applied correctly.
Known limitations🔗
For information about supported features and known limitations, see Mobile embed limitations.
Expo go sandbox🔗
If you are using Expo Go to develop and test your mobile app, you can use the ThoughtSpot mobile embed project in Expo code sandbox. This project includes the following files:
-
Auth.ts- Includes the code required to get authentication token from ThoughtSpot via REST API SDK. -
App.tsx- Includes the code for expo app setup. -
Home.tsx- Includes the code for the main screen and the form to populate embed view configuration, theinitfunction with thetsHostandusername, Liveboard ID, and custom style specification. -
LiveboardView.tsx- Defines the interface configuration properties and event interaction settings for the Liveboard embed view.
You can use similar files in your project setup or an index file for the ThoughtSpot mobile embed code.