Build your first search-driven analytics app with the ThoughtSpot SDK
1. Overview
This tutorial introduces embedding applications using ThoughtSpot Everywhere with the Visual Embed SDK. This tutorial does not cover the ThoughtSpot REST API calls. You can find more information about the available REST APIs in the ThoughtSpot documentation.
Using HTML5 and Javascript, you will:
1. Create a simple web application that contains ThoughtSpot visual components.
2. Learn how to Initialize the interface with ThoughtSpot.
3. Embed different visual components.
4. Enable and disable different features of the UI.
While this project uses plain HTML5 and JavaScript, you can use the same techniques in any framework that supports JavaScript and HTML.
Information: Pinboards have recently been replaced by Liveboards. This change is taking place in phases. The first phase will be deployed December 2021 and will include product naming, navigation, and UI. Phase two, available in 2022 will update API paths, parameters and SDKs. Until Phase two is deployed, you will still need to refer to pinboards within any code related development.
This tutorial will continue to refer to pinboards for code-based steps or examples until phase two is generally available. |
2. Getting started
Prior to beginning this tutorial you need the following:
- Working knowledge of HTML and JavaScript. If you want to manipulate the style, CSS is also useful, but not required.
- Access to a ThoughtSpot Cloud instance running version ts7.april.cl or later. If you do not already have access to ThoughtSpot Cloud, you can sign up for a free trial account at https://www.thoughtspot.com/trial.
- Data with a prebuilt worksheet and liveboard. If using the trial account, you can use Sample Retail - Apparel and the liveboard of your choice. You can find more information on making data connections with Embrace, creating worksheets, and creating liveboards in the documentation.
- A webserver to host the application. There are a variety of web servers you can run locally and connect to from localhost. This tutorial will use Python3’s http.server, A list of common, simple servers can be found here: https://gist.github.com/willurd/5720255
|
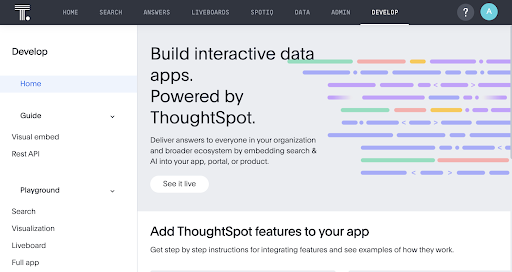
3. Using the Developer Portal
Access the Developer Portal by first logging into ThoughtSpot and then clicking the Developer tab. You will need to be logged in with either Admin or Develop privileges.
This portal provides interactive instructions and code samples that are very helpful with the development of embedded applications. We will be using the Playground to get IDs for various visual components as part of this tutorial.
Explore the Developer Portal, especially the Playground area. You can try out any of the embedding options and see what the code looks like along with the results.
Sample code has been provided throughout that you can copy, but an easier approach is simply to copy from the Developer’s Playground. Create the embed object in the playground and then copy the code from there into your code. For example, the following shows the display of a liveboard:
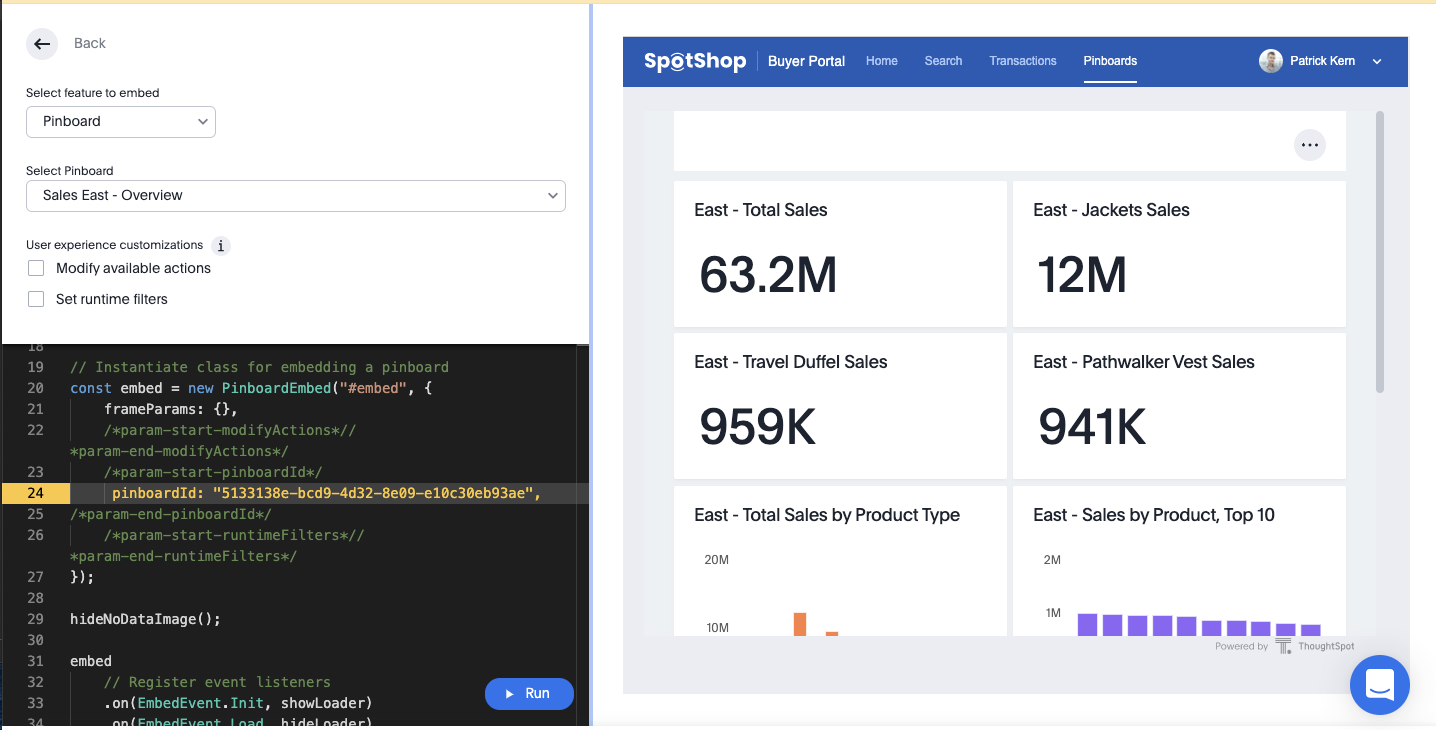
In the section with the code, just copy the declaration for the embed object, in this example:
const embed = new PinboardEmbed("#embed", {
    frameParams: {},
    /*param-start-modifyActions*/
    /*param-end-modifyActions*/
    /*param-start-pinboardId*/
    pinboardId: "5133138e-bcd9-4d32-8e09-e10c30eb93ae",
    /*param-end-pinboardId*/
    /*param-start-runtimeFilters*/
    /*param-end-runtimeFilters*/
});
As long as your div tag has an ID of “embed”, this code will work. Just be sure to call embed.render(). The end result (without comments) in your code would be
const embed = new PinboardEmbed("#embed", {
 frameParams: {}
 pinboardId: "5133138e-bcd9-4d32-8e09-e10c30eb93ae",
 }
);

embed.render();
4. Implementation Steps
- Set up a new embedding project
- Initialize ThoughtSpot embedding
- Embed search
- Embed a single liveboard
- Embed a single visualization
- Embed the full application
Note: If you are using your own cluster, you will likely need to set the security settings. See Appendix B: Security Settings for details.
Step 1: Set up a new embedding project
Next, you need to set up your new project. For purposes of this tutorial, we will place all files into a single folder (directory). Download the tutorial files on GitHub. You can also clone the repository to easily get updates. You will only need the files from the tse_tutorial folder.
There are three main code files and multiple images we will be using:
index.html
- tse.js - Code for your project. This is the primary file you will modify for the embedding code.
- index.html - HTML template for embedding ThoughtSpot. This file will not need to be modified.
- tse.css - Cascading Style Sheet for style and layout. This file will not need to be modified.
- .png files - images for the logo, icon, and initial page.
This file is the HTML file for the entire project. You will not need to modify the HTML file, but it is useful to understand a few main parts.
The following code can be found near the bottom of index.html. The
<div id='embed' class='hidden'>
   <p><em>Select an embedding option from the navbar.</em></p>
</div>
<script src='https://unpkg.com/@thoughtspot/visual-embed-sdk/dist/tsembed.js'></script>
<script src='tse.js' type='module'></script>
tse.js
This file contains all of the code we will use for embedding. The key methods we will be updating are the onLogin, onFullApp, etc. functions that respond to events in the UI to embed code.
Step 2: Start the webserver
At this point, you should have a folder on your file system with the files. You will also want to have a text editor for editing the files. While you can use any text editor, one specific for web documents is recommended.
To test that your webpage loads, start the server. For example, if you are going to use the Python3 server, navigate to the folder from the command line and run
$ python3 -m http.server 8000
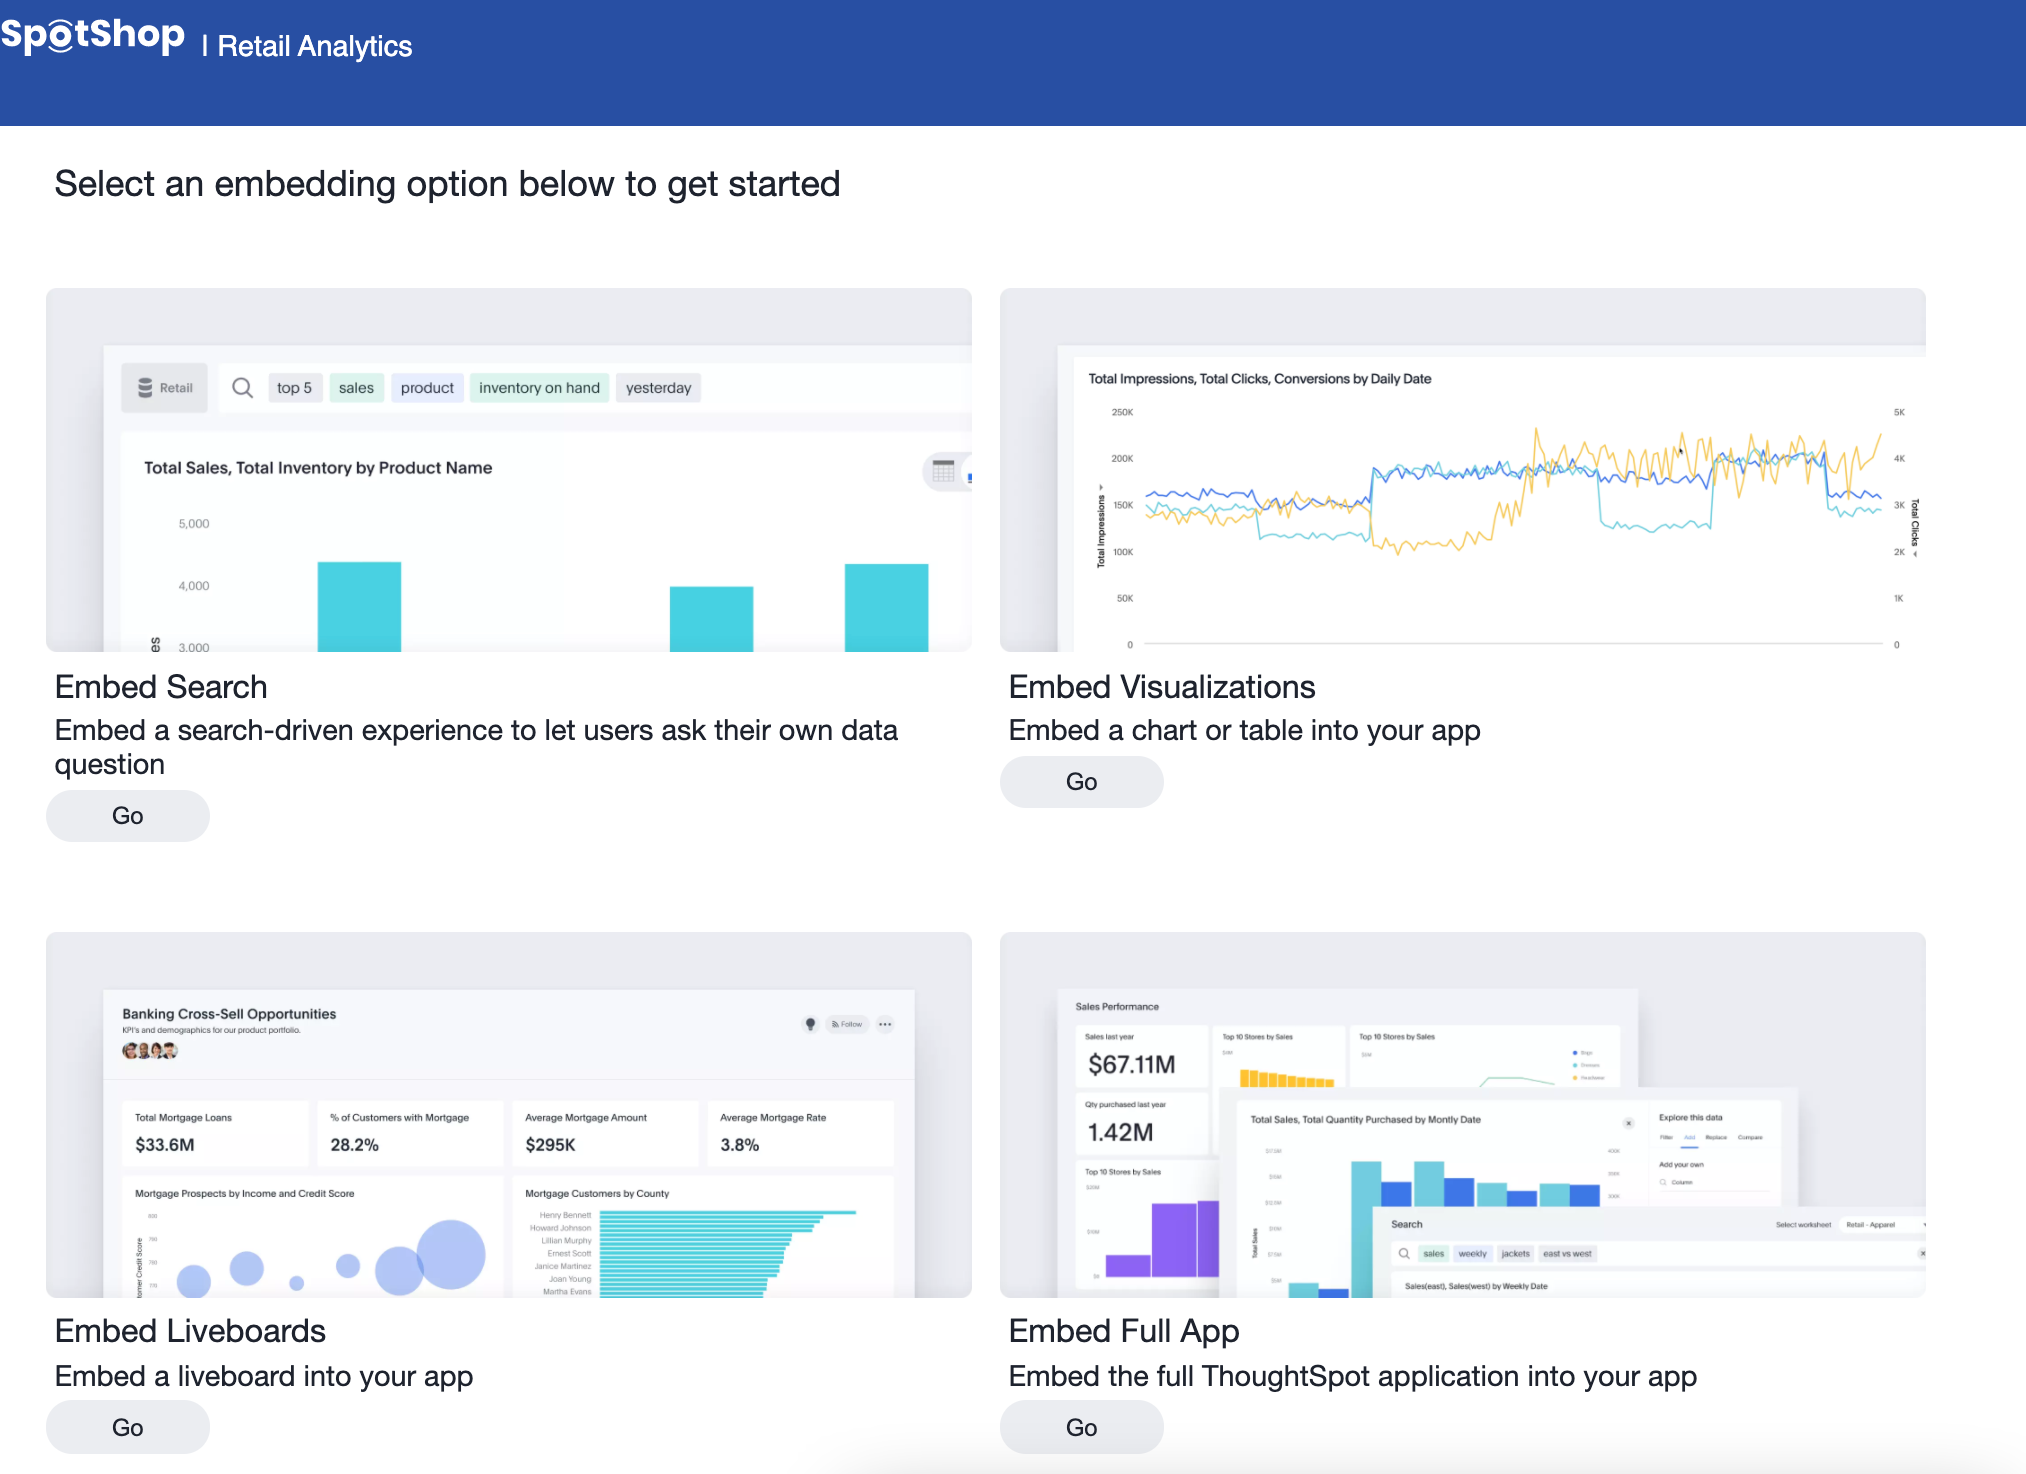
Then, in your browser go to http://localhost:8000. You should get a page that looks similar to the following. The URL shown on the page may be different.
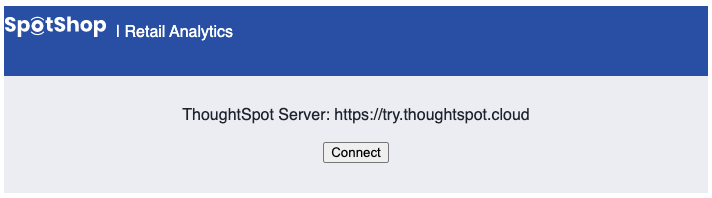
Step 3: Initialize ThoughtSpot embedding
Before you can embed content, you have to initialize the ThoughtSpot connection. This involves specifying the ThoughtSpot URL along with the authentication type.
To set the server, edit the tse.js file and set the tsURL value to your server. Your ThoughtSpot trial URL may begin with my1.thoughtspot.cloud or my2.thoughtspot.cloud, so match it accordingly. Save your changes.
const tsURL = "https://my1.thoughtspot.cloud/";
If you change the value to the server you are using and reload your screen, you should see the correct server. If your page doesn’t change, you may need to disable caching. See Appendix A: Development Environment for details on how to disable in Chrome.
The initialization step authenticates to ThoughtSpot for future calls. The SDK supports multiple authentication approaches, for this tutorial we are using either AuthType.None. See the documentation for more details on all the available authentication options and their parameters.
The init code looks like the following. A thoughtSpotHost and authType are required for all types of authentication. Depending on the type of authentication you may have other parameters as well.
init({
 thoughtSpotHost: tsURL,
 authType: AuthType.None
});
Note that with AuthType.None, you may be prompted to log into ThoughtSpot. ThoughtSpot will remember after the first time you log in until the session expires. Tip: if you are giving a demo, log in before the demo and your session will be active so you won’t be prompted to log in.
This code gets added to the onLogin method of the tse.js file. Make the proper changes and run the code. Note that the screen will load in either case, so you may want to open your developer console to see any errors that might occur.
After adding the code and logging in, you should see a page similar to the following:
Step 4: Embed search
We will start off by embedding search. You will use a two-step process for embedding all objects. First, you create the embed object and then you render it. By breaking this into two steps you could create a set of objects and just call render based on user activity.
You will need data and a worksheet as mentioned in the Requirements section.
First, create the embed component and then call render(). In the onSearch function add the following code:
const embed = new SearchEmbed('#embed', {
 frameParams: {},
});

embed.render();
You can also specify the datasource to use:
dataSources: ["cd252e5c-b552-49a8-821d-3eadaa049cca"]
The easiest way to get the datasource ID is to use the Developer Playground using the following steps:
- Click the Develop tab in ThoughtSpot
- Select Search under Playground
- Select the datasource from the dropdown list
- You will see a line for the dataSources get added
- If you click Run, you will see Search update with the chosen source already selected
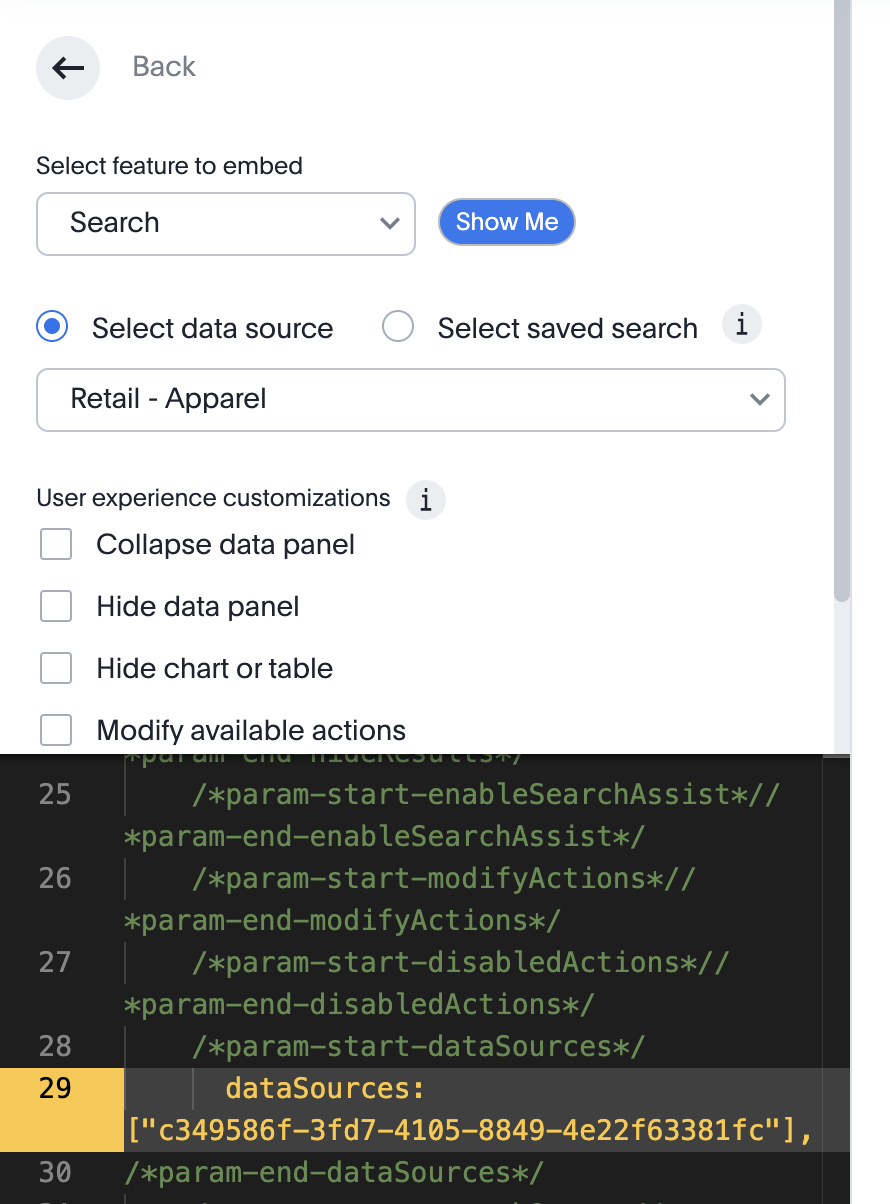
If you add the dataSource, the new code looks like (with your ID):
const embed = new SearchEmbed('#embed', {
 frameParams: {},
 dataSources: ["c349586f-3fd7-4105-8849-4e22f63381fc"],
});
Now if you select the Search option, you should see something like the following:
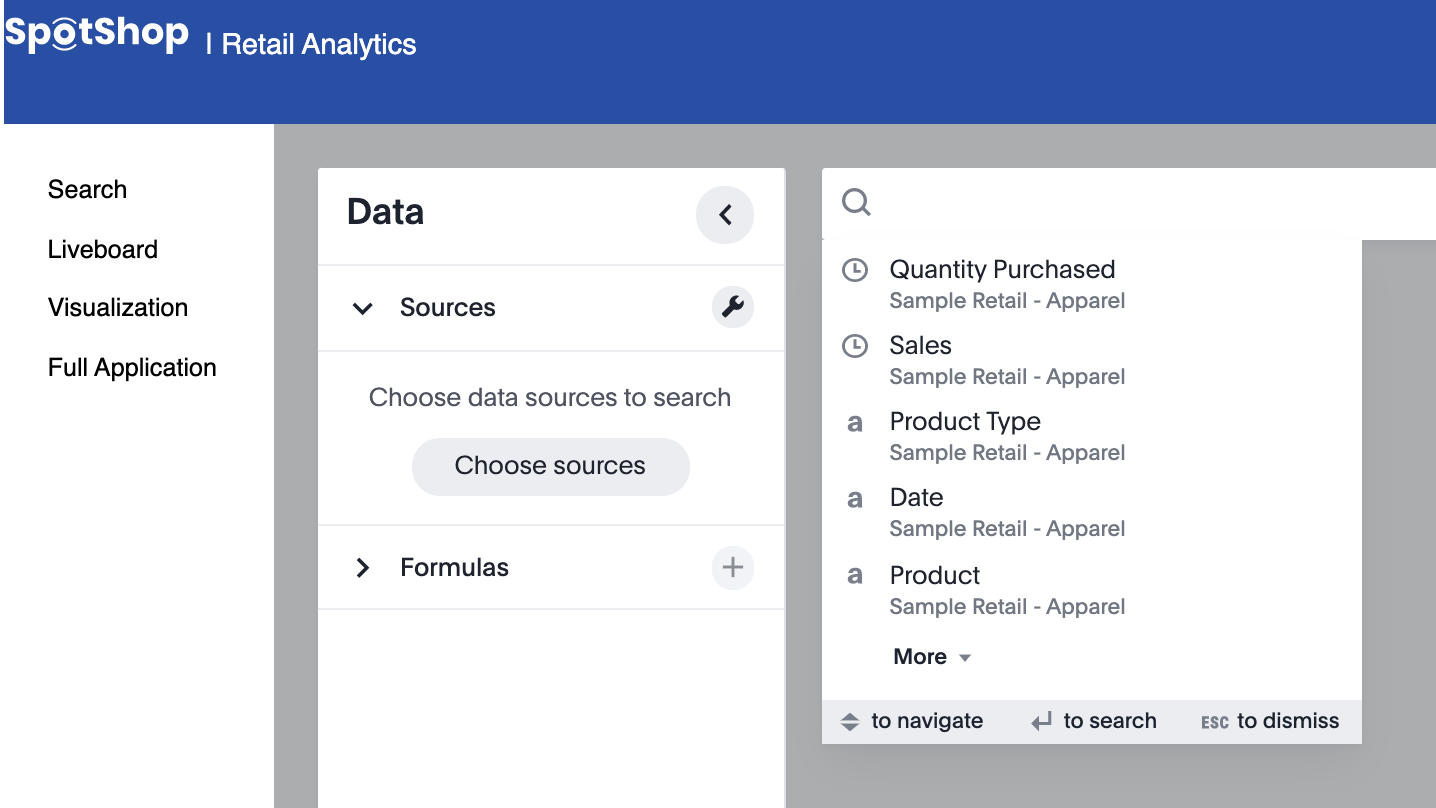
Note that your search suggestions, sources, etc. will differ.
Step 5: Embed a single liveboard
Before you can embed a liveboard you need to get the pinboard ID. To get the ID, use the Developer Playground again, but select Liveboard and then select a liveboard from the drop-down menu.
In this case, the pinboard ID is "2ba03345-d20f-4a10-9509-6e13bbb2e32a".
Now create the following code, setting the PINBOARD_ID to your pinboard ID.
const embed = new PinboardEmbed("#embed", {
 frameParams: {},
   pinboardId: "2ba03345-d20f-4a10-9509-6e13bbb2e32a",// TODO - set to your pinboard ID.

 }
);

embed.render();
Now if you select the Liveboard option, you should see something like the following:

Step 6: Embed a single visualization
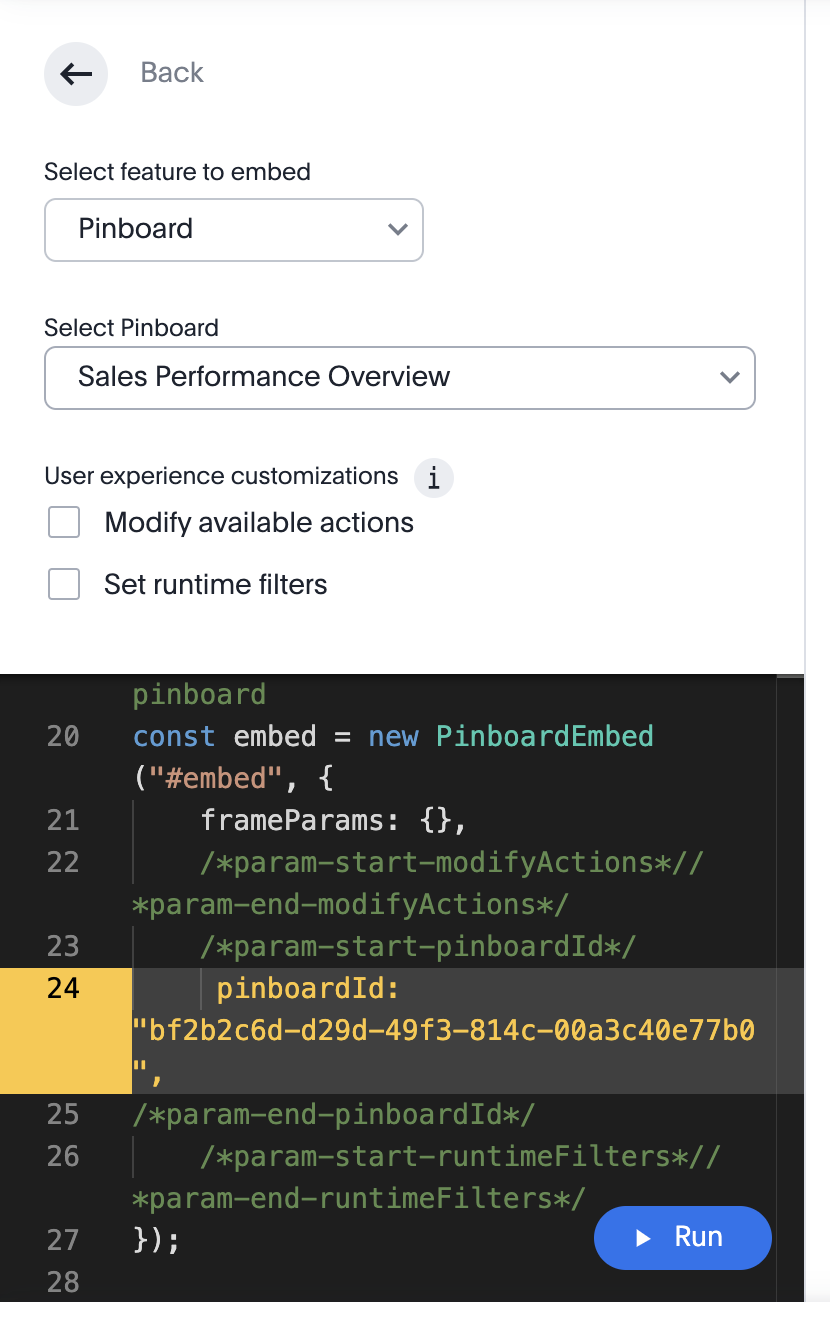
You can also embed a single visualization from a liveboard. To get the link to the visualization use the Developer Playground and select Visualization. Then select a liveboard and visualization from the dropdown to get the IDs.
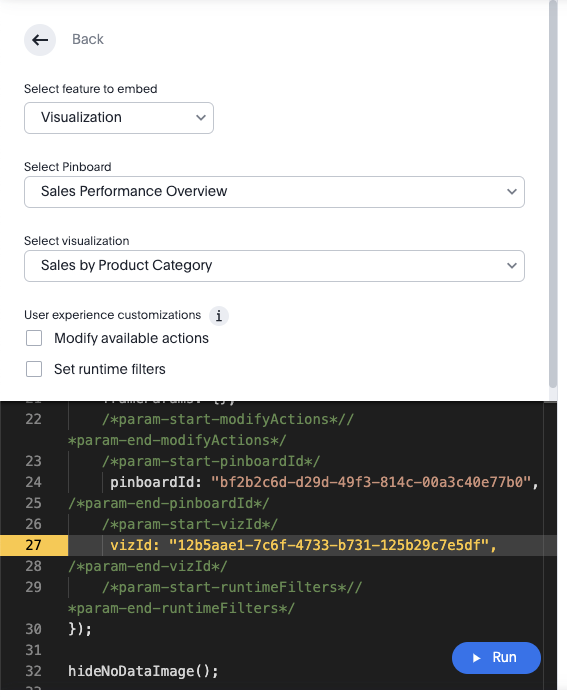
Now capture the pinboard ID and visualization ID.
Pinboard ID: bf2b2c6d-d29d-49f3-814c-00a3c40e77b0
Visualization ID: 12b5aae1-7c6f-4733-b731-125b29c7e5df
Next, update the code to use your IDs and add the following:
const embed = new PinboardEmbed('#embed', {
 frameParams: {},
 pinboardId: 'bf2b2c6d-d29d-49f3-814c-00a3c40e77b0',  // TODO - set to your pinboard ID.
 vizId: '12b5aae1-7c6f-4733-b731-125b29c7e5df', / TODO - set to your visualization ID.

});

embed.render();
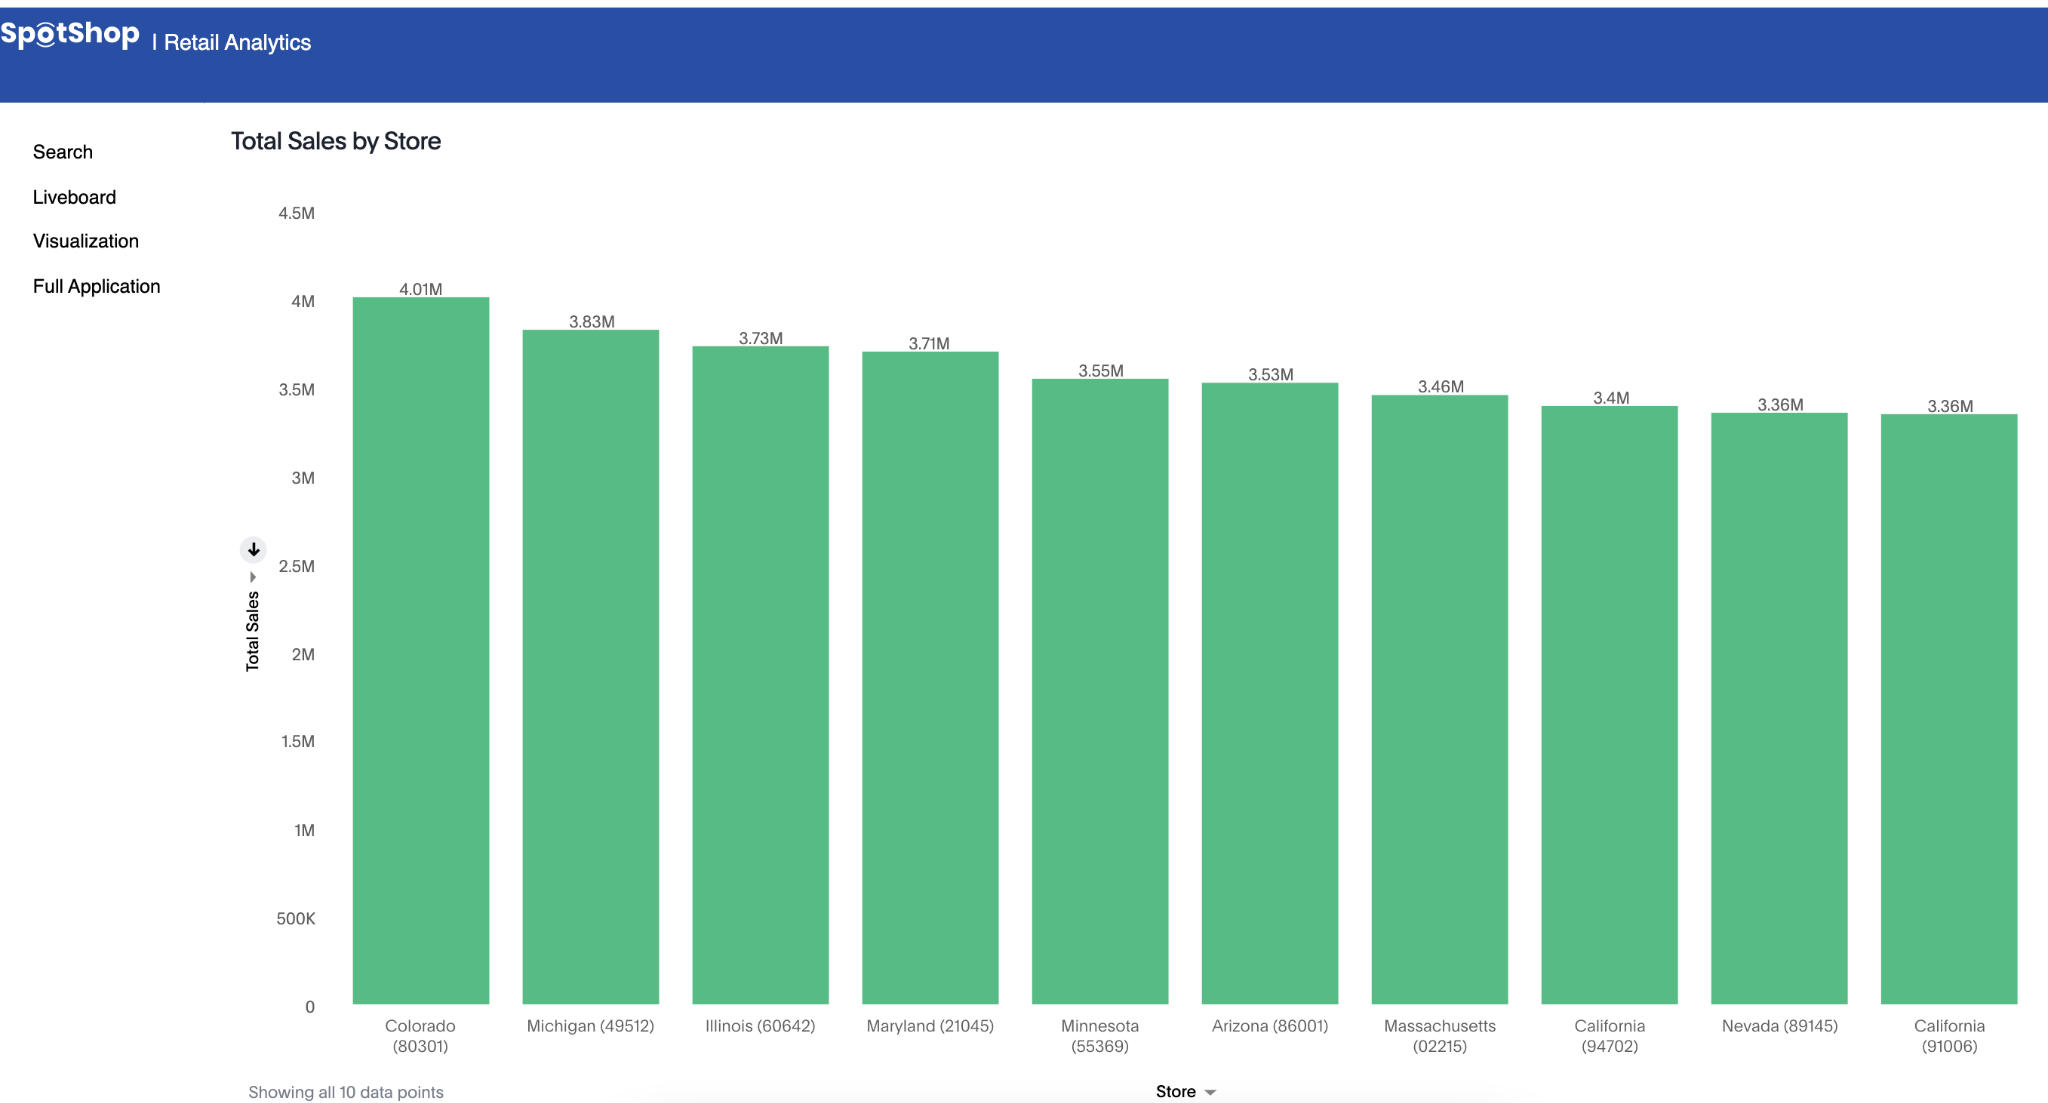
Now select Visualization from the navbar and you should see something like the following:
Step 7: Embed the full application
Finally, you can embed the full application. You can do this with and without the navigation bar. If you don’t include the navigation bar, you will have to provide the navigation capabilities as part of your application.
In the onFull function, add code to embed. For simplicity, the error handling is not shown.
const embed = new AppEmbed('#embed', {
 frameParams: {},
 pageId: Page.Home, // loads the Home tab.  Others can be loaded.  See Page enum.
});

embed.render();
This sample shows full embedding with the starting page being the Home page. You can specify any of the pages, such as Data, Liveboards, etc. See the documentation for the full list of parameter options.
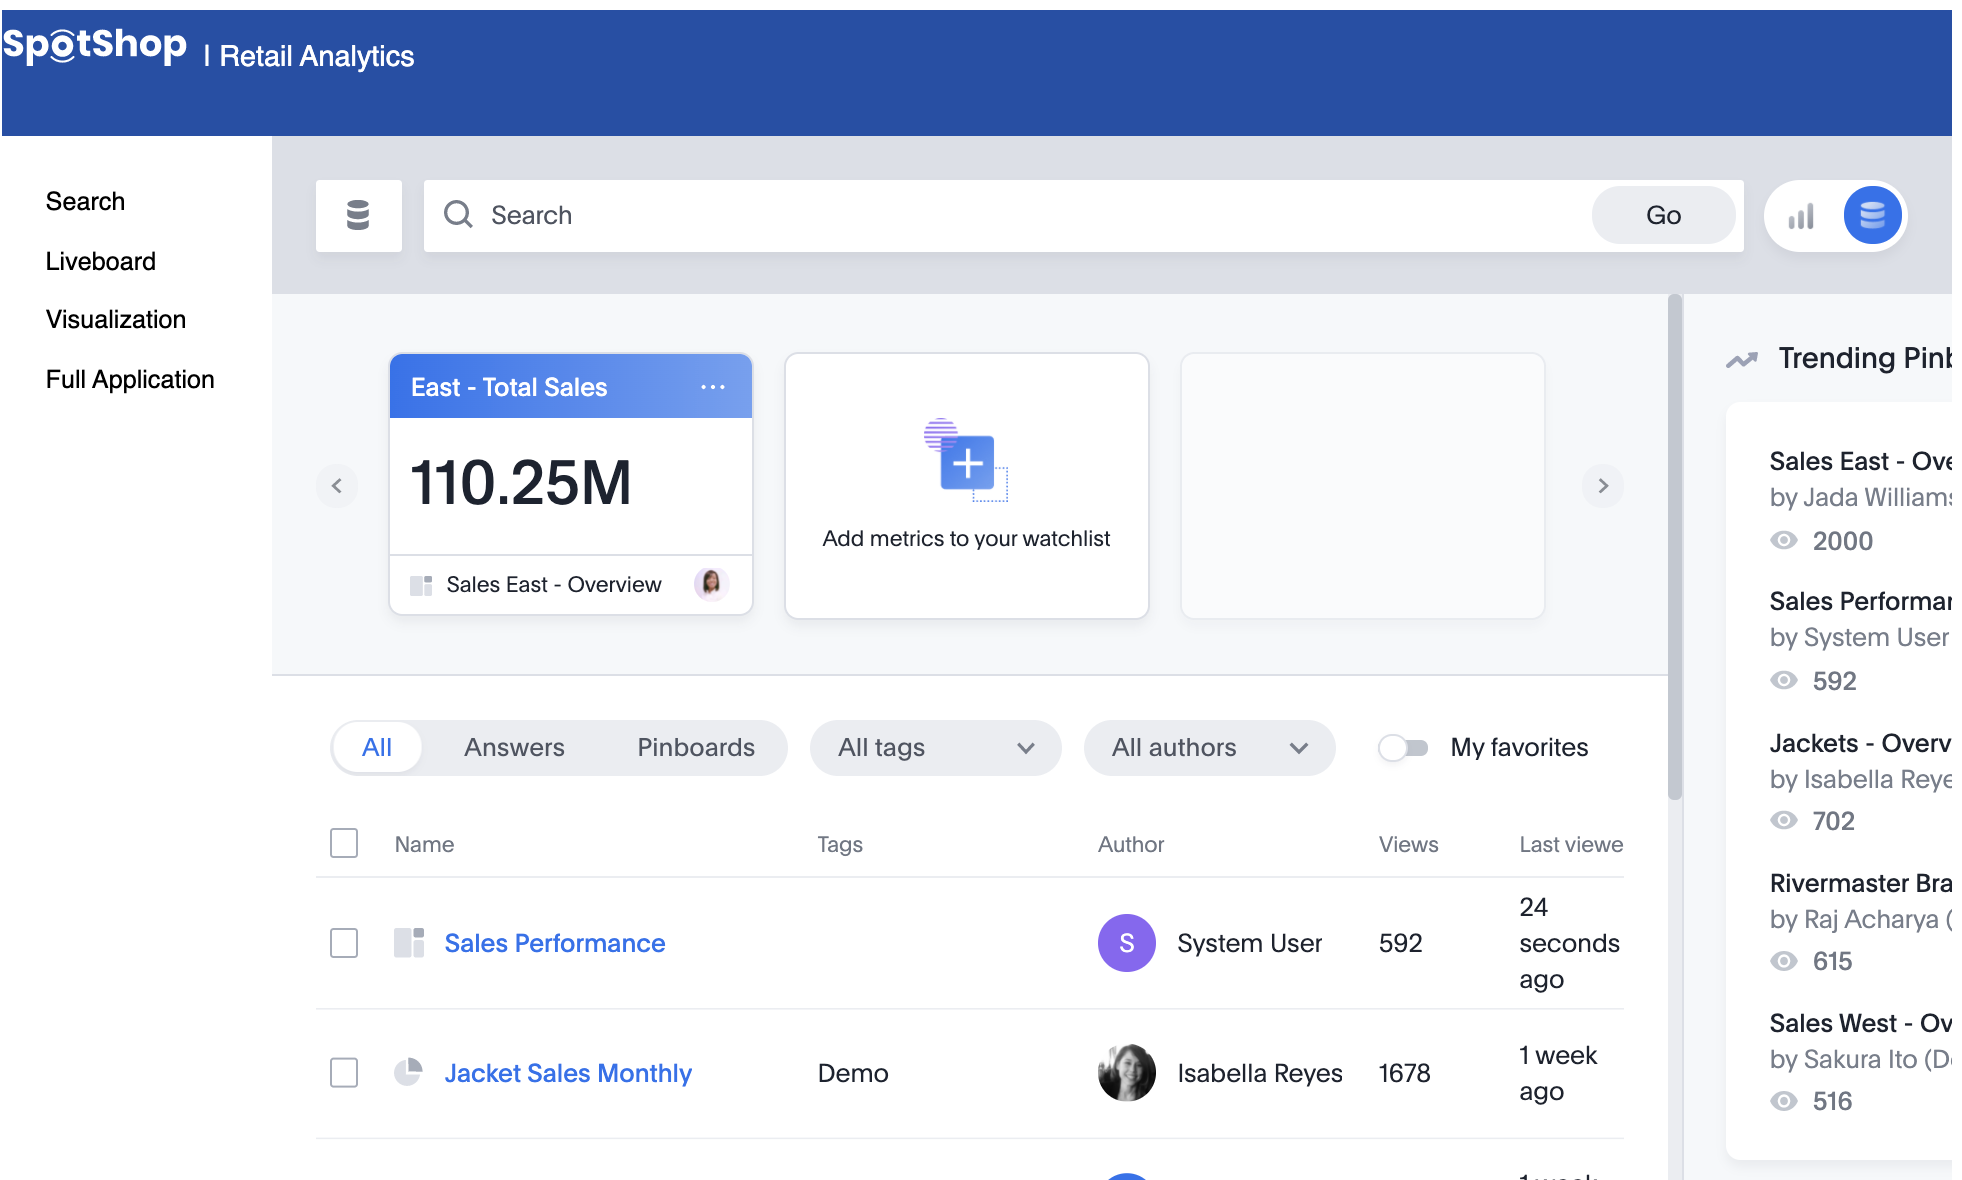
After updating the code and selecting the full navigation option, you should see a page like the following.
You can also specify a path instead of a pageId. Using the path attribute lets you go to any location, such as to a specific liveboard. When you use PinboardEmbed you get a limited number of options, for example, you can’t make a copy. But if you give a path to the liveboard, you get all available options (that aren’t disabled). These paths have a special shortcut syntax, e.g. pinboard/
The syntax in this scenario is:
const embed = new AppEmbed('#embed', {
 frameParams: {},
 path: "pinboard/2ba03345-d20f-4a10-9509-6e13bbb2e32a", // loads the specific pinboard.
});

embed.render();
Optional: Hiding and Disabling Features
All of the steps so far have shown embedding with the default functionality. However, it’s often desired to give customers access to only some features and provide enhanced functionality based on licensing. In this section, you will disable and hide different features. Not all actions are covered here. See the ThoughtSpot documentation for the available options.
All embedding options have three attributes you can set:
disabledActions: [Action.??],
disabledActionReason: '<reason for disable>’,
hiddenActions: [Action.??, Action.??],
- disabledActions - these are actions that will be visible but greyed out and unusable.
- disabledActionReason - this is the reason an action is disabled. It will show up as a tooltip when the user hovers on the action.
- hiddenActions - these features will not be shown to the user.
For a complete list of actions that you can disable and hide, see the ThoughtSpot documentation.
Hiding and Disabling in Search
Add the following code to your SearchEmbed component:
disabledActions: [Action.SpotIQAnalyze],
disabledActionReason: 'Enterprise feature.',
hiddenActions: [Action.Download, Action.Share, Action.DownloadAsCsv],
This change will disable SpotIQ and say it’s an “Enterprise feature”. It will hide downloading and sharing options.
Hiding and Disabling in Liveboards
Add the following code to your PinboardEmbed component:
disabledActions: [Action.DownloadAsPdf],
disabledActionReason: 'Enterprise feature.',
hiddenActions: [Action.PinboardInfo]
This change will disable the ability to download as PDF and hide the Liveboard Info option. Note that since there is only one item left, the More menu switches to just have the download button.
Hiding and Disabling in Visualizations
Add the following code to your EmbedPinboard (visualization) component:
disabledActions: [Action.Download],
disabledActionReason: 'Enterprise feature.',
hiddenActions: [Action.SpotIQAnalyze]
This change will disable the ability to download and will hide SpotIQ.
5. Conclusion
In this tutorial, you created an application with ThoughtSpot embedded using the visual SDK. These techniques can be used in any JavaScript environment. Not all features from the SDK were covered, so see the documentation for additional details.
6. Appendix A: Development Environment
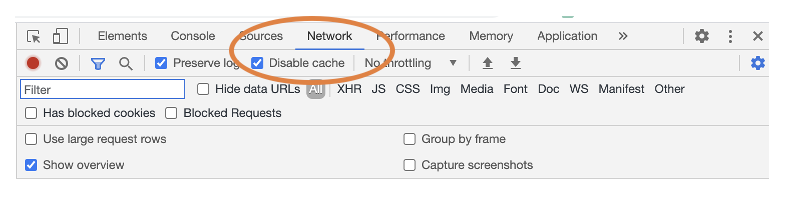
This tutorial was developed and tested using the latest version of Chrome. Version 89.0.4389.128 (Official Build) (x86_64) or greater. It is recommended that you open the Developer Tools to see any errors that might occur. You can learn more about opening Chrome Developer Tools by opening https://developer.chrome.com/docs/devtools/open/
To avoid cached versions of your code during the development, you should also disable the cache. With the developer tools pane open, click on the Network tab, then make sure the option to Disable cache is selected.
If your code isn’t working properly you should look for errors in the console. Select the Console button in the developer tools. Then you will see an error message with the error and the line of code.
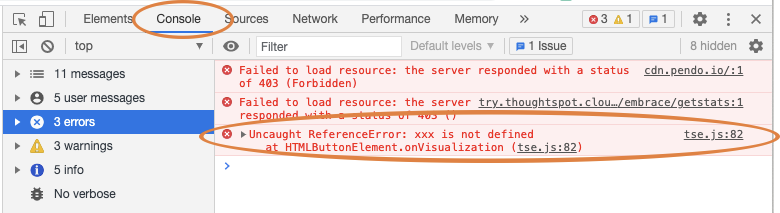
You can click on the filename and line, here it’s tse.js:82 and be taken to the code with the error:

7. Appendix B: Security Settings
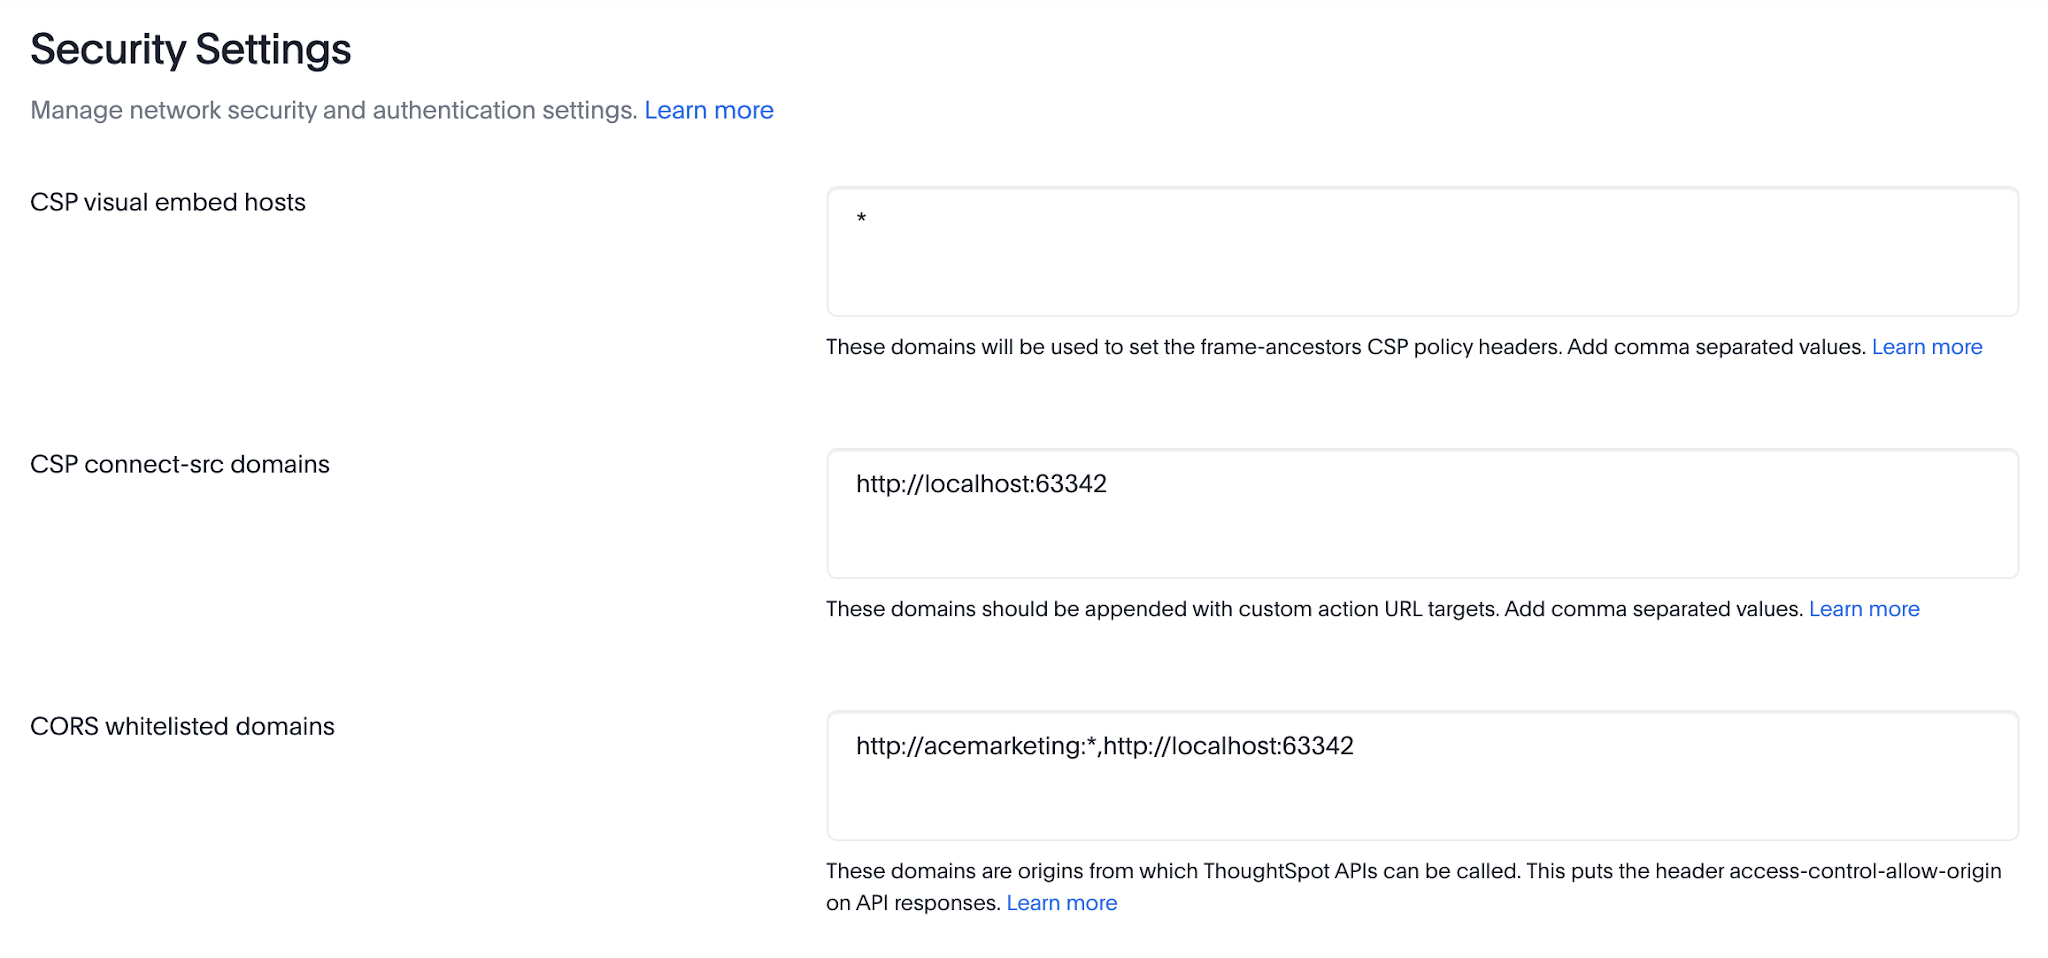
If you are using your own server, you will need to configure the security settings for your server. These settings are located in the Developer tab by selecting Security Settings from the menu on the left. For this tutorial, you only need to set the CSP virtual embed hosts setting. Other security settings are described in the documentation.
The CSP visual embed hosts setting specifies the domains that will be allowed to connect via the SDK. Enter your full URL for the embedding app, such as http://localhost:8000. For testing purposes, you can set this to star (asterisk) and any domain can connect. It is recommended that you use specific URLs for production environments for best security.
The CSP connect-src domains setting is used for custom actions. You must enter the full URL (including protocol and port) for the targets of custom actions. This includes the callback custom action that returns to the embedding application.
If you are planning on using any of the login approaches, such as AuthType.Basic, you will also need to set the CORS whitelisted domains setting. Enter your full URL for the embedding app, such as http://localhost:8000. Note that this will be changed in the future to remove the requirement for the protocol. This setting will always be set in production environments.
It is common in production environments to have the embedding host in all three of these settings. For example, if you are embedding into https://my-portal.company.com and have callback actions, then you would set that URL in all three boxes.
Example settings: